MFT Agent installation
What is it?
The MFT Agent installation procedure sets up the OpCon MFT Agent on a Windows server and connects it to an OpCon environment so that file transfer jobs can be scheduled and run.
- Use this when performing a new installation of the OpCon MFT Agent on a server
- Use this when upgrading an existing OpCon MFT Agent to a newer version
- After installation, the agent must be configured in Solution Manager and authenticated before file transfer jobs can run
The OpCon MFT environment consists of an OpCon MFT Agent and the SMAMftAgentProxy, which provides the communication link between OpCon and the OpCon MFT Agent. The SMAMftAgentProxy is contained within the SMANetCom environment and is installed automatically when the core OpCon component is installed.
There is a one-to-one relationship between an OpCon environment and an OpCon MFT Agent due to the authentication token used between them.
OpCon MFT Agent installation
The OpCon MFT Agent software can be downloaded using the OpCon Web Installer. It is listed as SMA OpConMFT under the Agents section. The software currently has a download option only. Once downloaded, the installer can be started manually outside the OpCon Web Installer.
The agent installation consists of running the installer program and accepting the license agreement. After the installation, if a system restart is required, restart the system.
Retrieve the OpCon MFT Agent port number
After the restart, retrieve the port number for communication with OpCon. This port number was automatically configured during the installation process.
To retrieve the port number, complete the following steps:
- In the Windows Start menu, open the OpConMFT 3.13 folder and select Desktop Configurator. The Configurator opens.
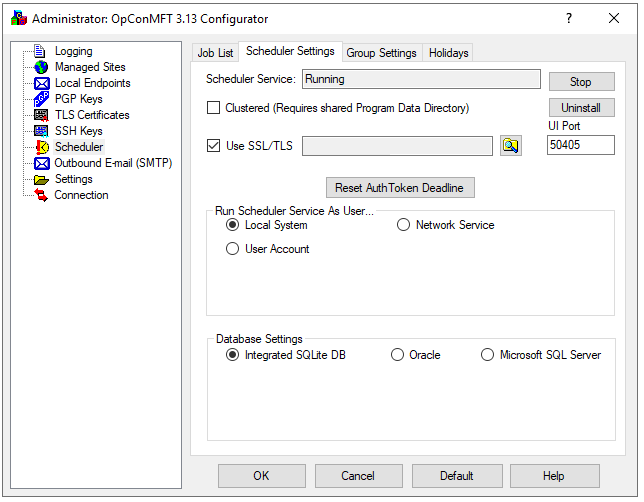
- Select the Scheduler option from the tree view, then select Scheduler Settings. The port number is displayed in the UI Port field.
Enable SSL/TLS
The installer creates a self-signed certificate for localhost and turns on Use SSL/TLS, so the web UI uses HTTPS by default. Replace that certificate with one issued for the server's host name so that browsers and OpCon trust the connection. To replace the certificate, complete the following steps:
-
In the Configurator, select the TLS Certificates option from the tree view and select Create.
-
Enter the certificate information:
Field Description City/Town Enter the name of your city or town Organization Enter the name of your organization State/Province/Region Enter the name of your region Common Name Enter a name for the certificate (for example, OpConMFTxxxwherexxxis a unique value if you have more than one OpCon MFT Agent)Country Enter the name of your country Unit Enter the name of your unit within your organization Password Enter a password to associate with the certificate Verify Password Re-enter the password E-mail Address Enter a valid email address to associate with the certificate -
Select Create Self Signed to create a self-signed certificate, or select Create Signing Request to produce information for purchasing a certificate from a CA.
-
On the Scheduler Settings screen, select the Use SSL/TLS option.
-
Select the browse option next to the Use SSL/TLS field and select the self-signed certificate you created or a certificate you imported.
Define the email SMTP server connection
The OpCon MFT Agent can be configured to send notifications. To enable notifications, complete the following steps:
-
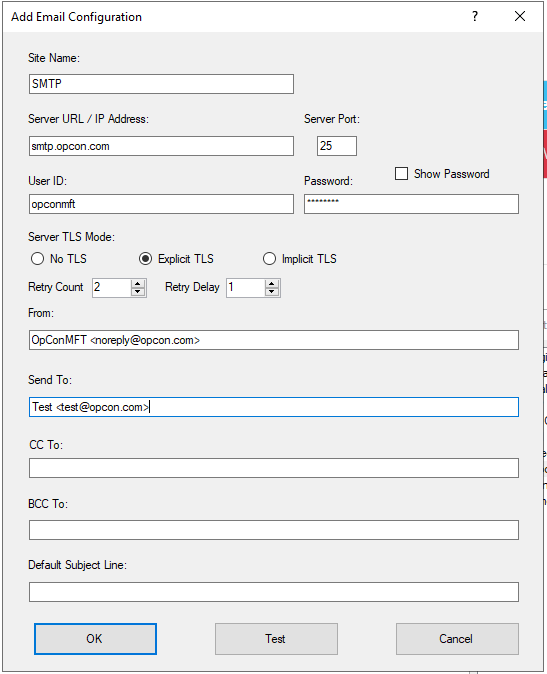
Select the Outbound E-mail (SMTP) option from the tree view and select the Add button.
-
Set the required options to configure the connection to the SMTP service:
Field Description Site Name Enter a name to identify the SMTP connection Server URL / IP Address Enter the address of the SMTP service Server Port Adjust the port number if required (default is 25) UserId / Password Enter credentials for the SMTP service No TLS / Explicit TLS / Implicit TLS Select the TLS option for the SMTP service From Enter the name to use as the sender for all notifications from the OpCon MFT Agent Send To Enter a recipient address to use when the Test button is selected -
Select the Test button to send a test message. If the connection fails, the software tests various TLS and port options to find a valid connection.
-
Once changes are complete, restart the SMA OpConMFT 3.13 Scheduler Service.
After the OpCon MFT Agent is installed, OpCon can complete the initial authentication for 24 hours. If the OpCon MFT Agent configuration in OpCon is not completed within this window, an error indicates that the token is not available. If this occurs, select the Reset AuthToken Deadline button on the Scheduler Settings tab of the OpConMFT Configurator to open a new 30-minute authentication window.
OpCon MFT Agent configuration
The configuration of the OpCon MFT Agent is completed using Solution Manager. To configure the agent, complete the following steps:
-
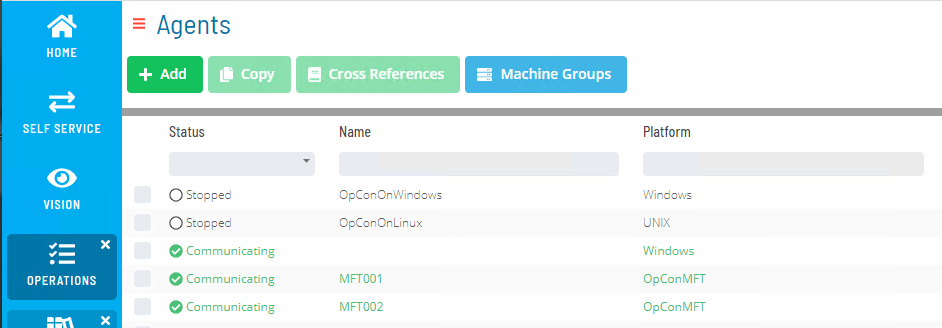
In Solution Manager, select Library and under the Administration menu select Agents.
-
Select + Add to configure a new OpCon MFT Agent.
-
Enter a name for the agent and select OpConMFT from the Machine Type list.
-
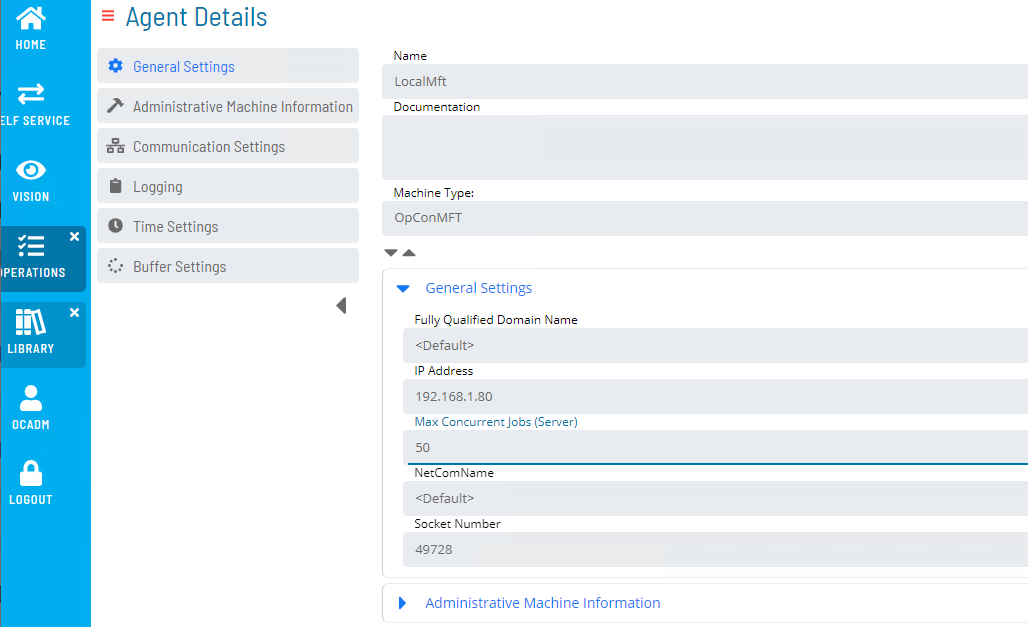
Select the General Settings tab and enter the address information, the Max Concurrent Jobs value, and the Socket Number (the UI Port number retrieved from the OpCon MFT Agent Scheduler Settings tab).
-
Select the Save button.
-
Select the Communications Settings tab and enter the JORS Port Number, which is the same port number used in the General Settings tab.
-
Select the Save button.
-
Go to the Operational Agents screen and select the created OpCon MFT Agent. The AgentSelection tab is displayed, which includes an Authentication button.
-
Select the Authentication button. A successful authentication message is displayed. The OpCon MFT Agent can then be started.
The OpCon MFT Agent accepts the initial authentication for 24 hours after it is installed. If authentication fails, OpCon can display a message such as Unable to update authentication token for machine — The request was cancelled due to the configured HttpClient.Timeout of 100 seconds. If that window has passed, select Reset AuthToken Deadline on the Scheduler Settings tab of the OpConMFT Configurator. This clears the agent's stored authentication token, so any existing authentication with OpCon stops working, and opens a 30-minute window in which to authenticate the agent from OpCon again.
MFT Agent upgrade
The installer replaces an existing installation when you upgrade from version 3.13.0 or later. Earlier versions install alongside the new version, and you import their settings with the Settings Importer.
Updating the OpCon MFT Agent requires careful preparation to avoid communication issues. To upgrade the agent, complete the following steps:
- Back up the configuration files. In the installation directory (default:
C:\Program Files\OpConMFT 3.13), open theprogramdatafolder and copyconfig.xmlandSchedulerService.sqliteto a safe location. A server snapshot is also recommended as an additional restore point. - Confirm that no OpCon MFT jobs are currently running.
- Stop the OpCon MFT Agent communication to prevent new job runs during the upgrade.
- Stop the Windows OpCon MFT services.
- Run the installer for the latest version and confirm it finishes correctly. When you upgrade from 3.13.0 or later, it replaces the existing version.
- Start the services and confirm that the MFT web UI is accessible from both the MFT server and the OpCon server.
- Reconnect the agent in OpCon. The agent should authenticate automatically.
- If authentication does not succeed automatically, select the Reset AuthToken Deadline button on the Scheduler Settings tab of the OpConMFT Configurator and re-authenticate.
FAQs
What happens if I miss the 24-hour authentication window after installation?
The OpCon MFT Agent accepts the initial authentication for 24 hours after it is installed. If that window has passed, select the Reset AuthToken Deadline button on the Scheduler Settings tab of the OpConMFT Configurator. This clears the agent's stored authentication token, so any existing authentication with OpCon stops working, and opens a 30-minute window in which to authenticate the agent from OpCon again. Within that window, re-authenticate from Solution Manager using the Authentication button on the Operational Agents screen.
Can I have more than one OpCon MFT Agent in the same OpCon environment?
Yes. Each OpCon MFT Agent has a one-to-one relationship with an OpCon environment via its authentication token, but you can configure multiple agents, each with its own machine definition in Solution Manager.
What port does the OpCon MFT Agent use to communicate with OpCon?
The port number is configured during installation and displayed in the UI Port field on the Scheduler Settings tab of the OpConMFT Configurator. This value must be entered as the Socket Number and JORS Port Number when configuring the agent in Solution Manager.
Related topics: