Define the ACS FiservDNA Agent Connection
Theme: Configure | Audience: System Administrator, Automation Engineer
Prerequisites
Before defining the agent connection, complete the following:
Open the agent definition form
The agent definition defines the information included in the generated SMARunDNAJob.ini file. Items highlighted in red are required. Global properties are supported.
Some fields appear only after you select the option they depend on. The sections below name the option for each of these fields.
To open the agent definition form, complete the following steps:
- Open Solution Manager.
- From the Home page select Library.
- From the Administration menu select Agents.
- Select +Add to add a new agent definition.
- Enter a unique name for the connection.
- Select Fiserv DNA from the Type list.
- Select General Settings and check the NetCom Name:
- Default for the OpCon server's SMANetCom.
- The name of the remote SMANetCom, for on-premises sites that run a remote SMANetCom on the Fiserv batch server. See Install Remote SMANetCom on Fiserv Batch Server.
- The SMA Relay name, if Relay is used.
- Select Fiserv DNA Settings and complete the sections below.
Fiserv DNA Settings
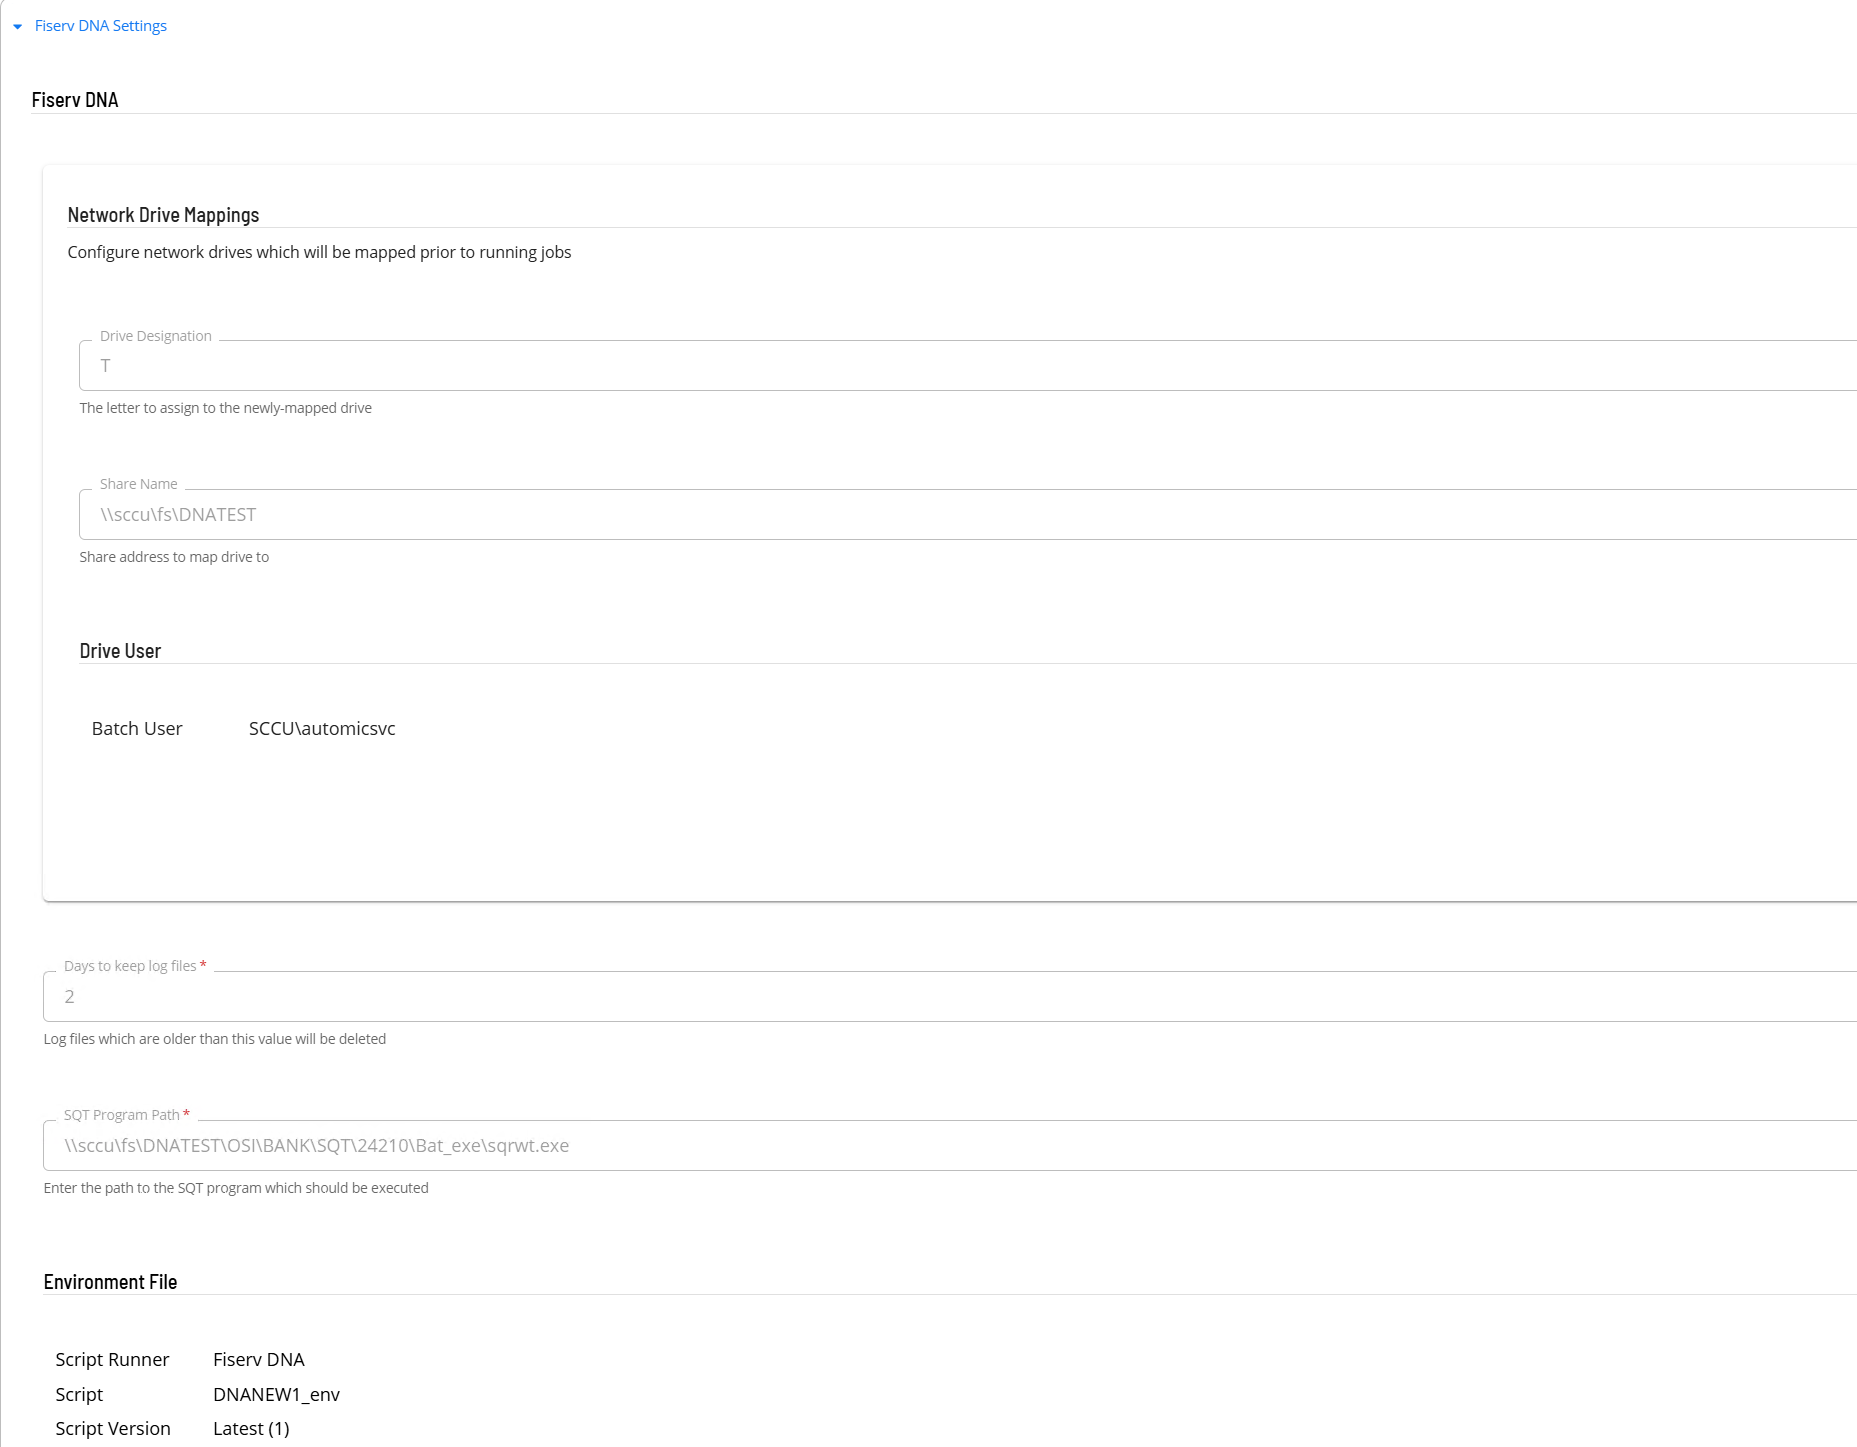
Network Drive Mappings
Network drives are mapped before each job runs. You can add up to 100 drive mappings.
- In the Drive Designation field enter the letter assigned to the mapped drive (one character).
- In the Share Name field enter the address of the drive mapping.
- In the Drive User field select the batch user to be used for the drive mapping.
Program and File Settings
- In the Days to keep log files field enter the number of days to keep log files. Log files older than this value are deleted. The default is 3 and the minimum is 1.
- In the SQT Program Path field enter the path to the SQT program to run.
- In the Environment File section select the script containing the environment information.
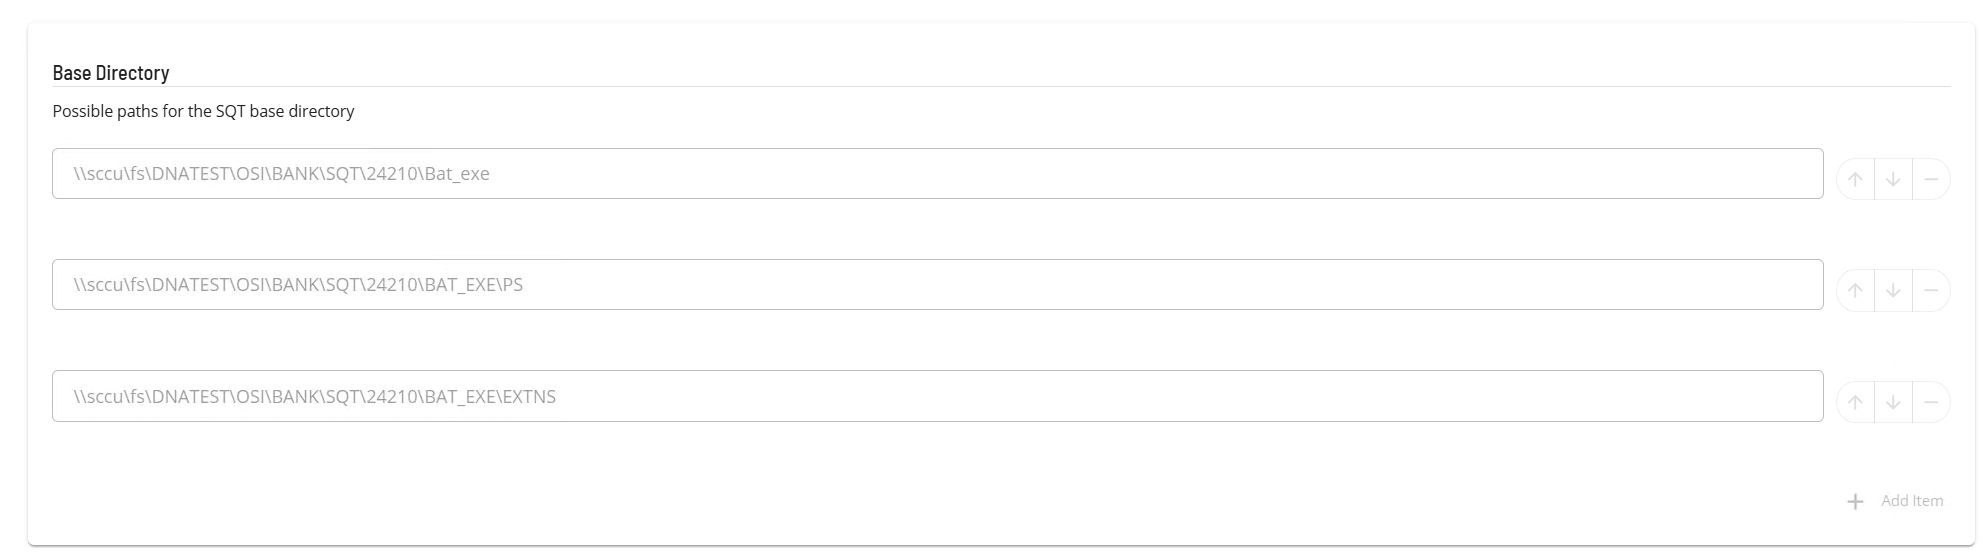
- In the Base Directory section enter the possible paths for the SQT base directory. Use the + Add Item button to add values, up to 99.
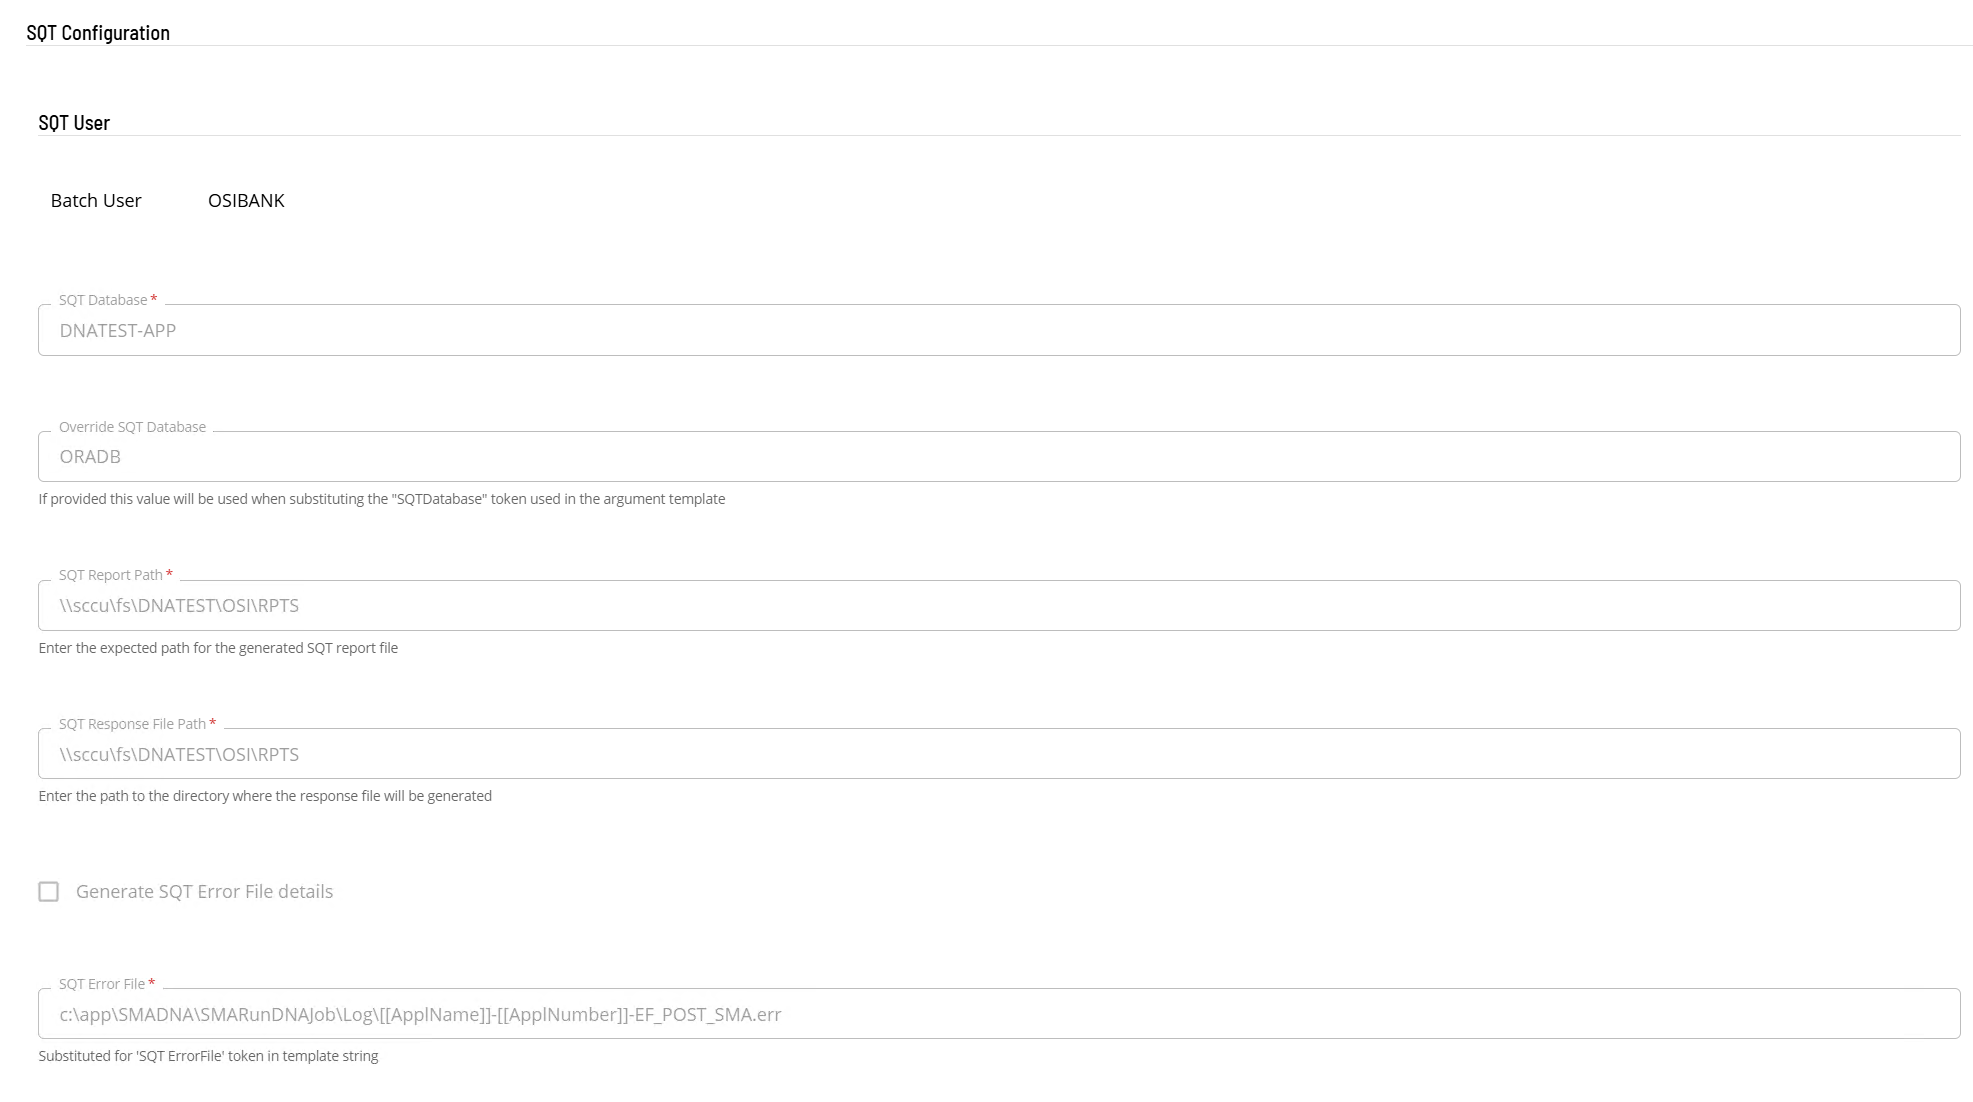
SQT Configuration
- In the SQT User field select the batch user to be used for SQT.
- In the SQT Database field enter the SQT database name.
- In the Override SQT Database field enter the override SQT database name. If provided, this value replaces the SQT database name in the SQT argument template.
- In the SQT Report Path field enter the expected directory for the generated SQT report file.
- In the SQT Response File Path field enter the path to the directory where the response file is generated.
- To have the connector generate the SQT error file value, select Generate SQT Error File details.
- If Generate SQT Error File details is cleared, enter the template string in the SQT Error File field. This field appears, and is required, only while the option is cleared.
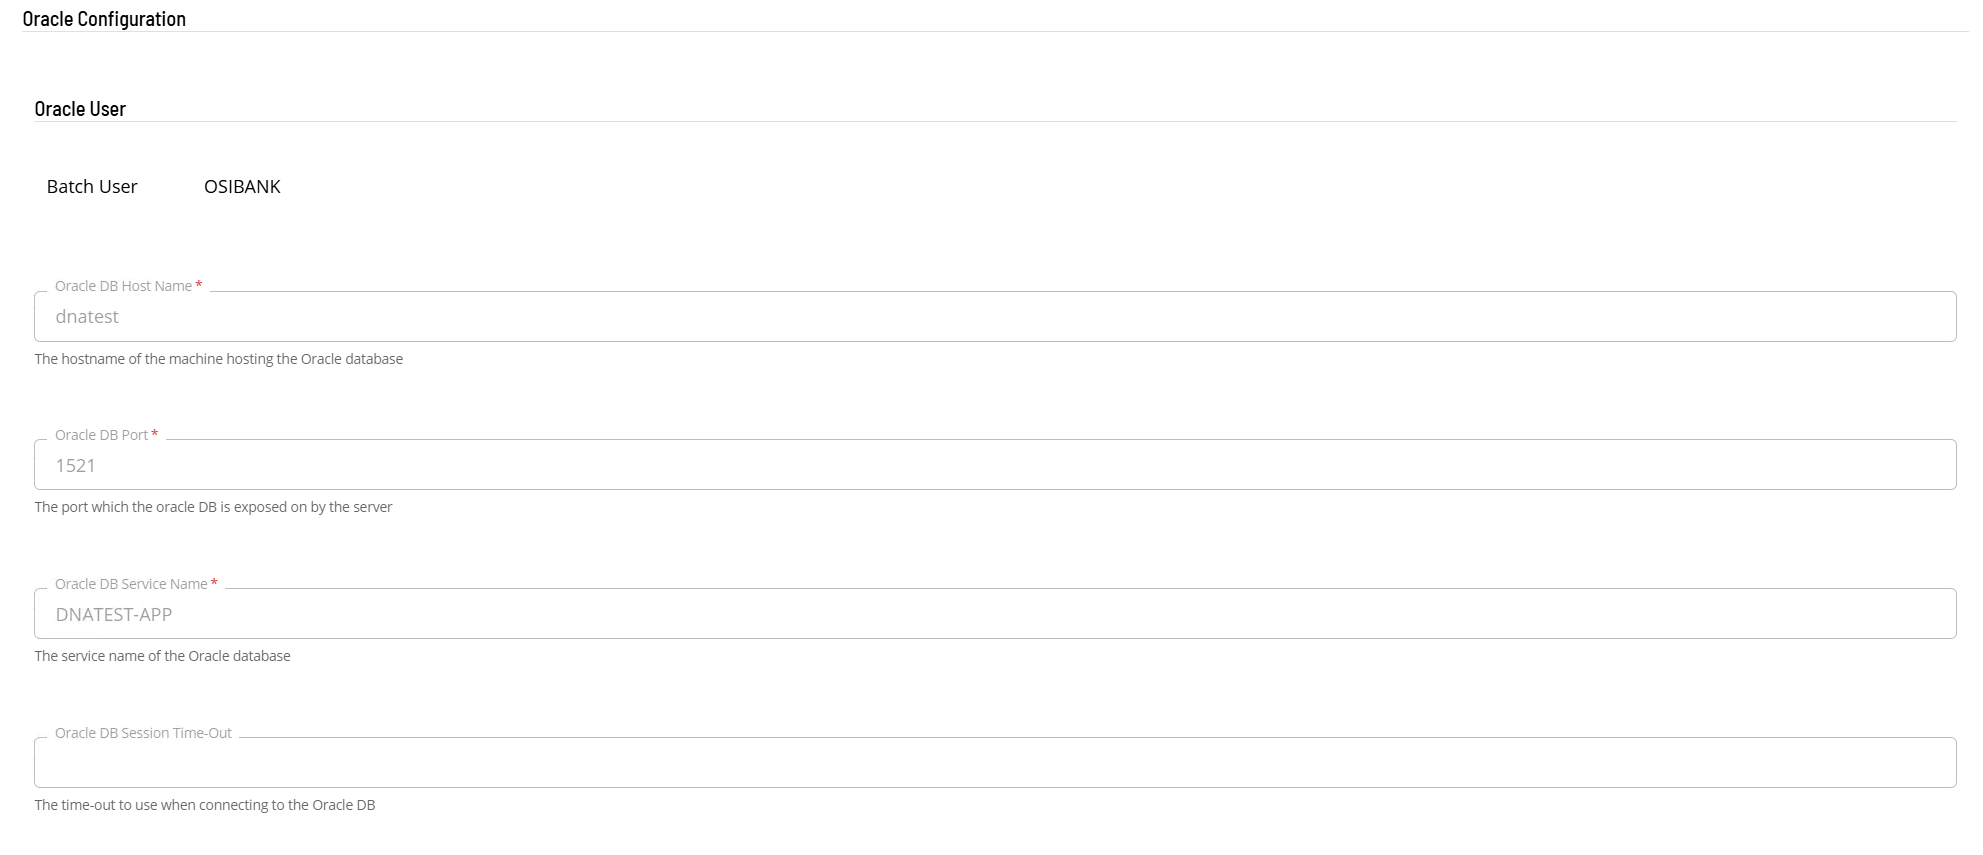
Oracle Configuration
- In the Oracle User field select the batch user to be used for the Oracle configuration.
- In the Oracle DB Host Name field enter the host name of the machine hosting the Oracle database.
- In the Oracle DB Port field enter the port on which the Oracle database is exposed.
- In the Oracle DB Service Name field enter the service name of the Oracle database.
- In the Oracle DB Session Time-Out field enter a time-out value to use when connecting to the Oracle database.
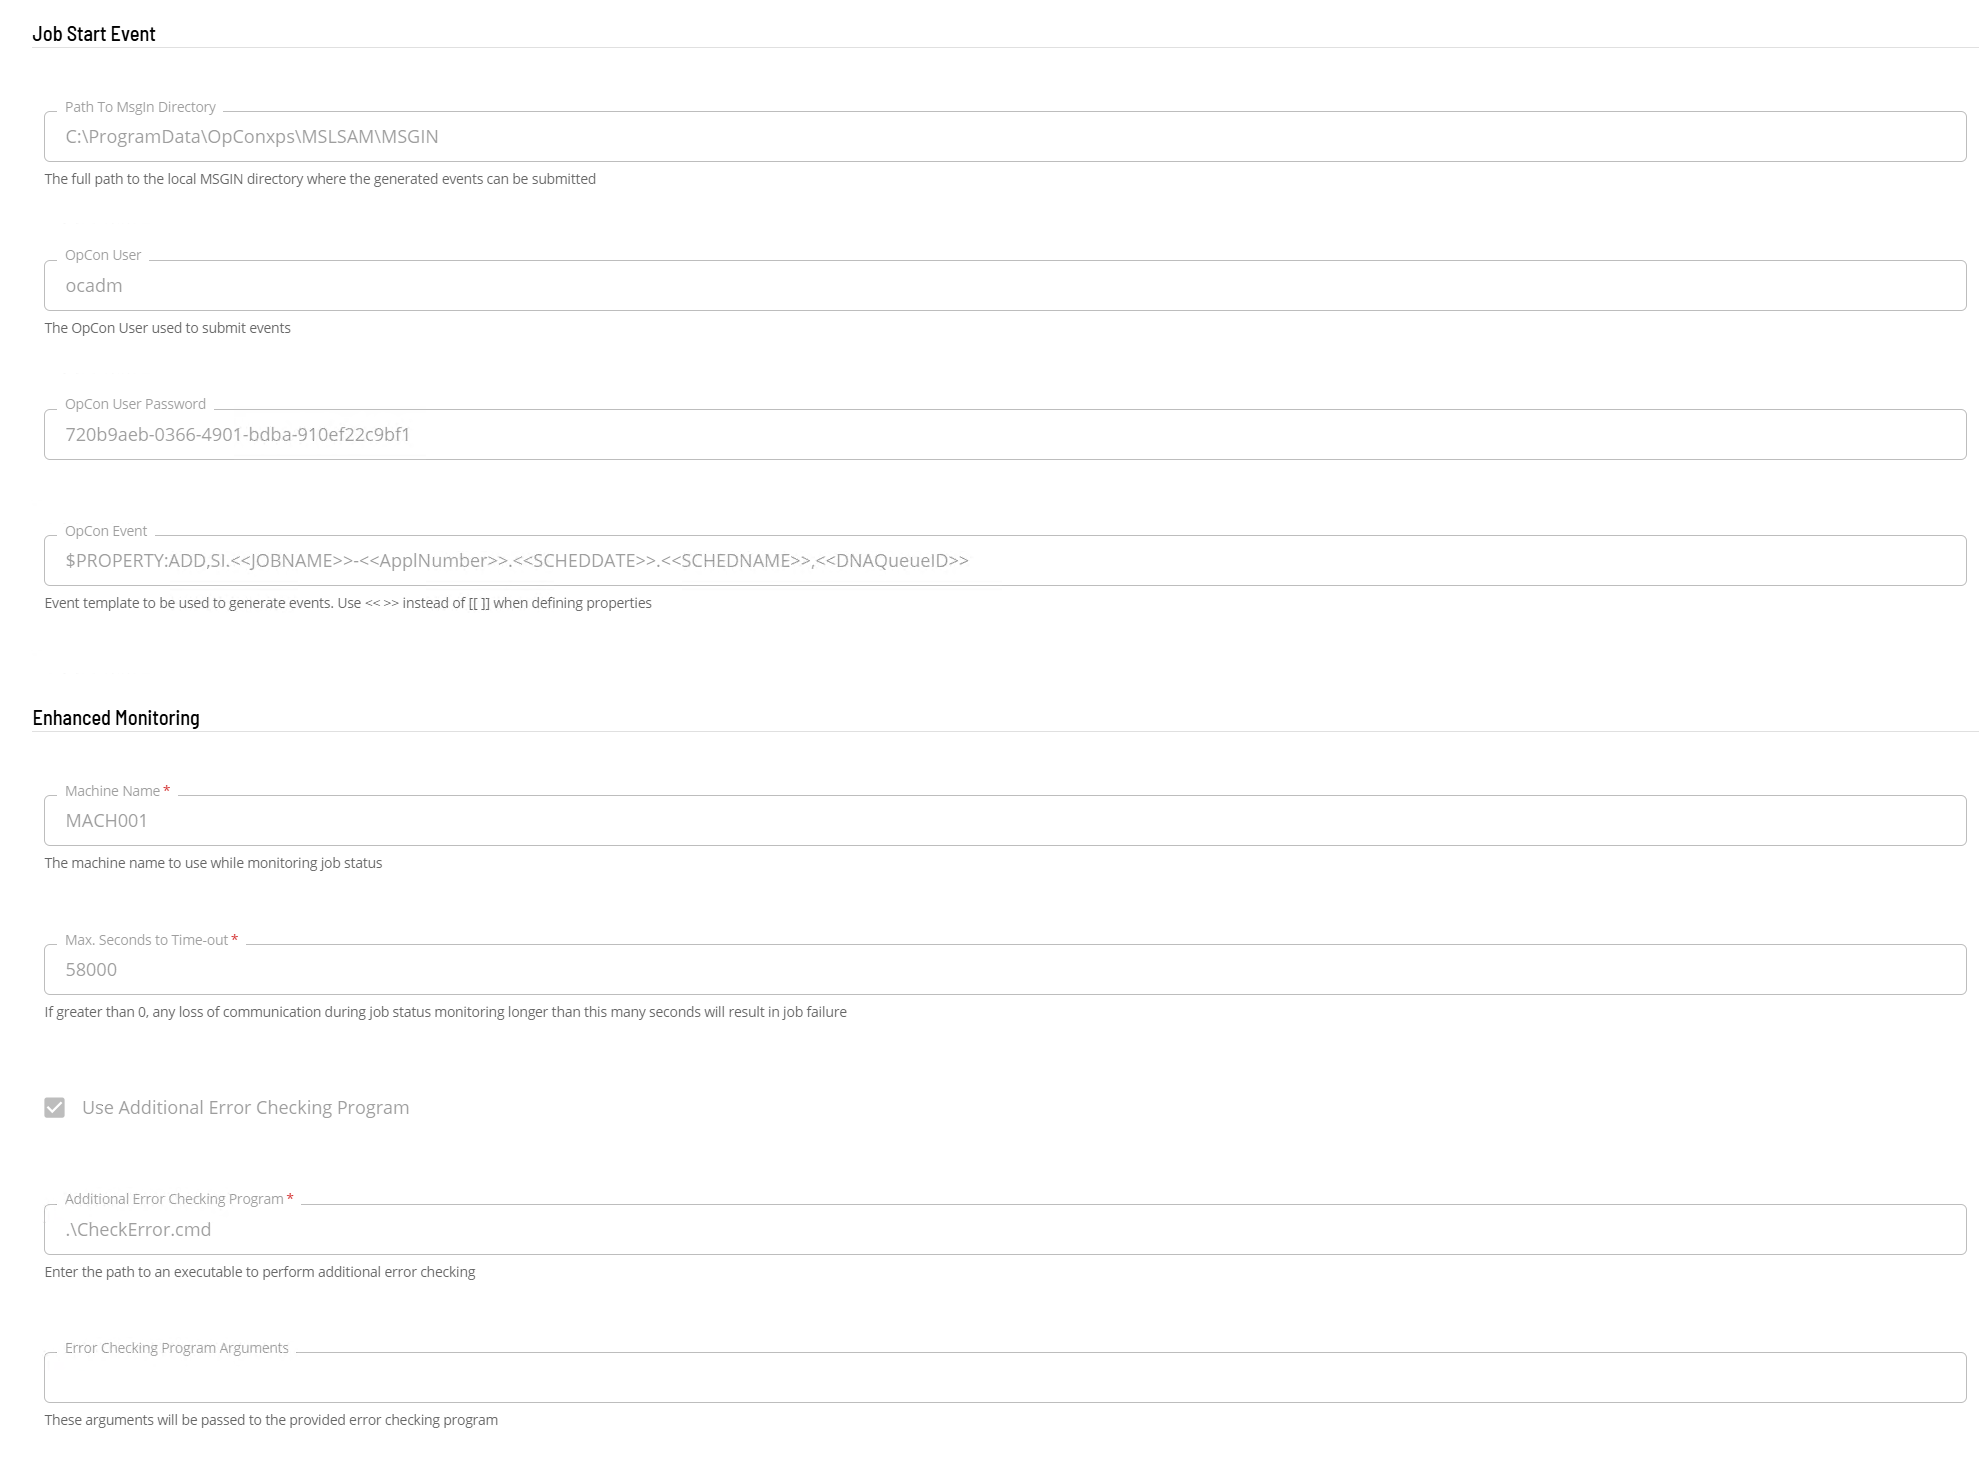
Job Start Event
For each job run, the connector writes the SQT user's password and the OpCon User Password value in plain text to files that Solution Manager lists as the job's output. Anyone who can view the job output can read them. Restrict who can view the output of Fiserv DNA jobs, and use a dedicated OpCon user for the Job Start Event. The OpCon User Password value is also shown in plain text on the agent definition form.
-
In the Path To MsgIn Directory field enter the full path to the MSGIN directory of the associated Windows Agent.
-
In the OpCon User field enter the OpCon user that submits the event.
-
In the OpCon User Password field enter the external token of the OpCon user that submits the event.
-
In the OpCon Event field enter the event template to use. If OpCon properties are defined in the template definition, use
<< >>pairs instead of[[ ]]. The default template is:$PROPERTY:ADD,SI.<<JOBNAME>>-<<ApplNumber>>.<<SCHEDDATE>>.<<SCHEDNAME>>,<<DNAQueueID>>
Enhanced Monitoring
- In the Machine Name field enter the name of the machine to use while monitoring job status.
- In the Max. Seconds to Time-out field enter the number of seconds. If the value is greater than 0, a loss of communication during job status monitoring that lasts longer than this many seconds fails the job. The default is 0, which sets no limit. A job's own Max. Seconds to Time-out replaces this value. See Task Definition.
- If required, select Use Additional Error Checking Program. The next two fields appear only after you select this option.
- In the Additional Error Checking Program field enter the path to an executable to perform the additional error checking.
- In the Error Checking Program Arguments field enter arguments to pass to the error checking program.
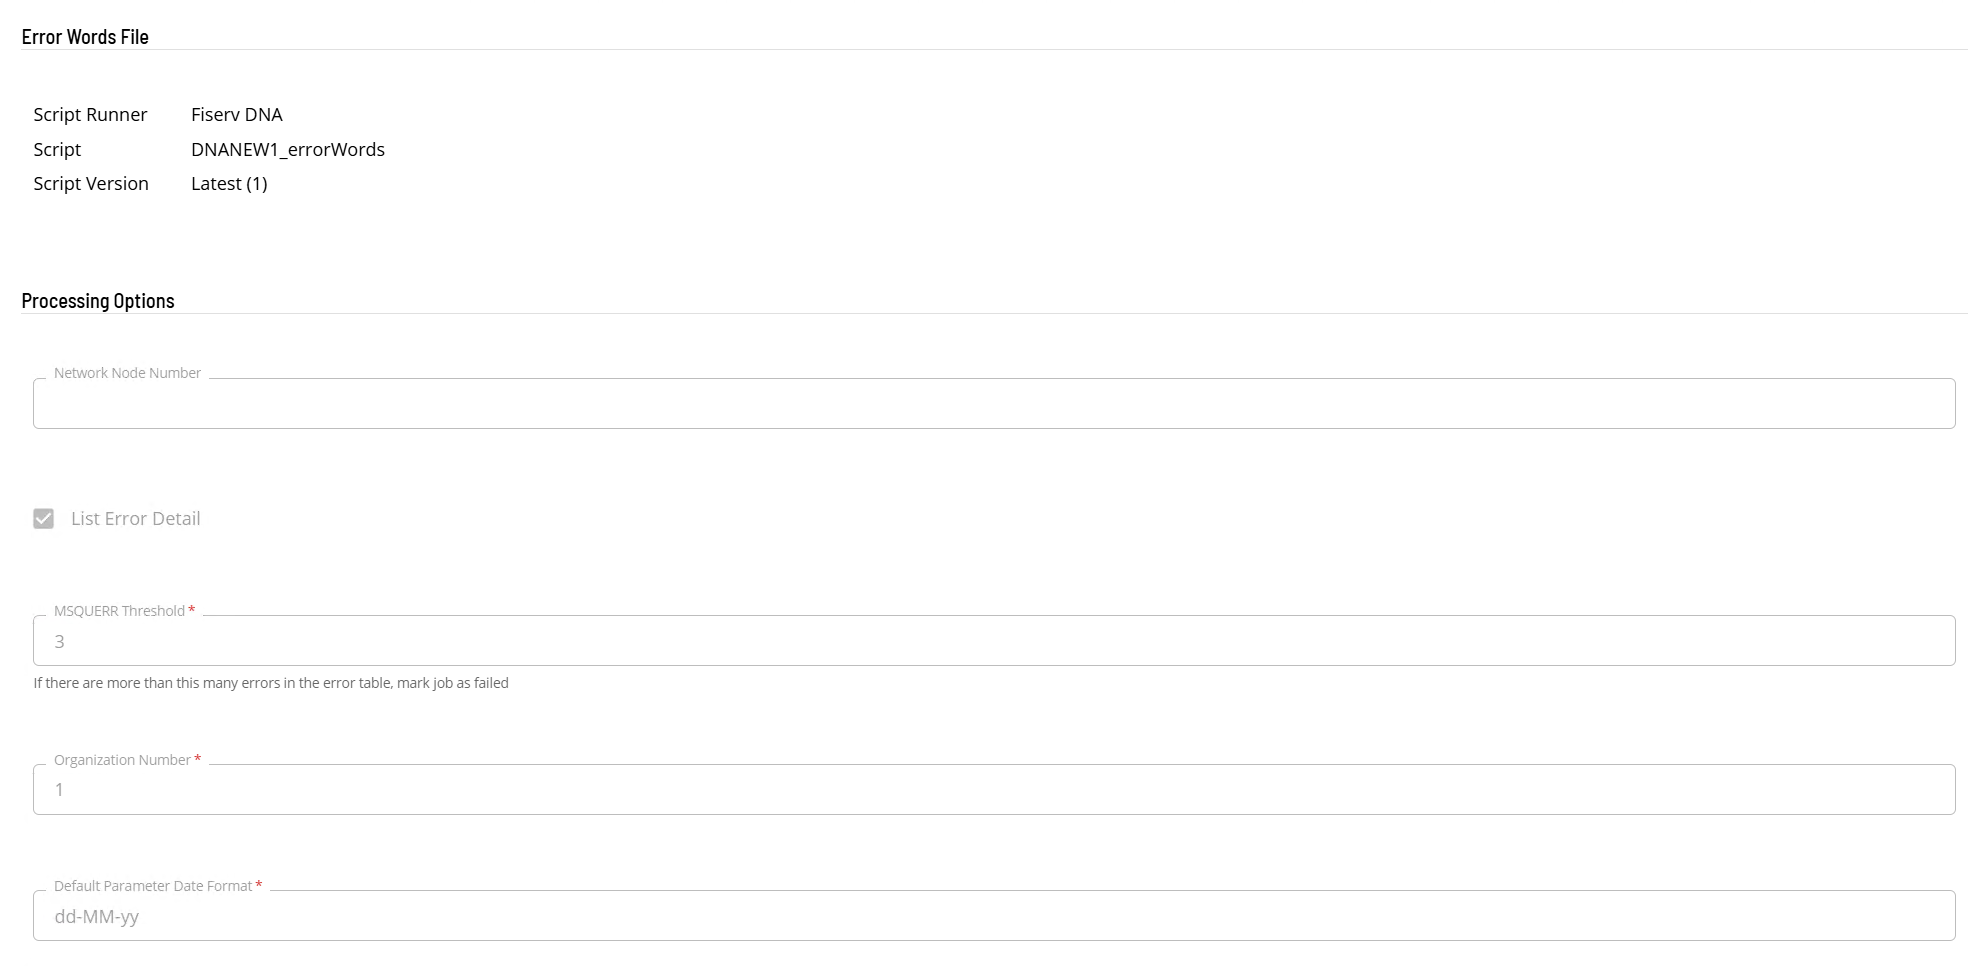
Error Words File
In the Error Words File section select the script containing the error words file information. This setting is optional.
Processing Options
- In the Network Node Number field enter the node number.
- If required, select List Error Detail to log additional errors found while processing the error table.
- In the MSQUERR Threshold field enter the threshold. If the error table contains more errors than this value, the job is marked as failed. The default is 0.
- In the Organization Number field enter the organization number.
- In the Default Parameter Date Format field enter the default date definition.
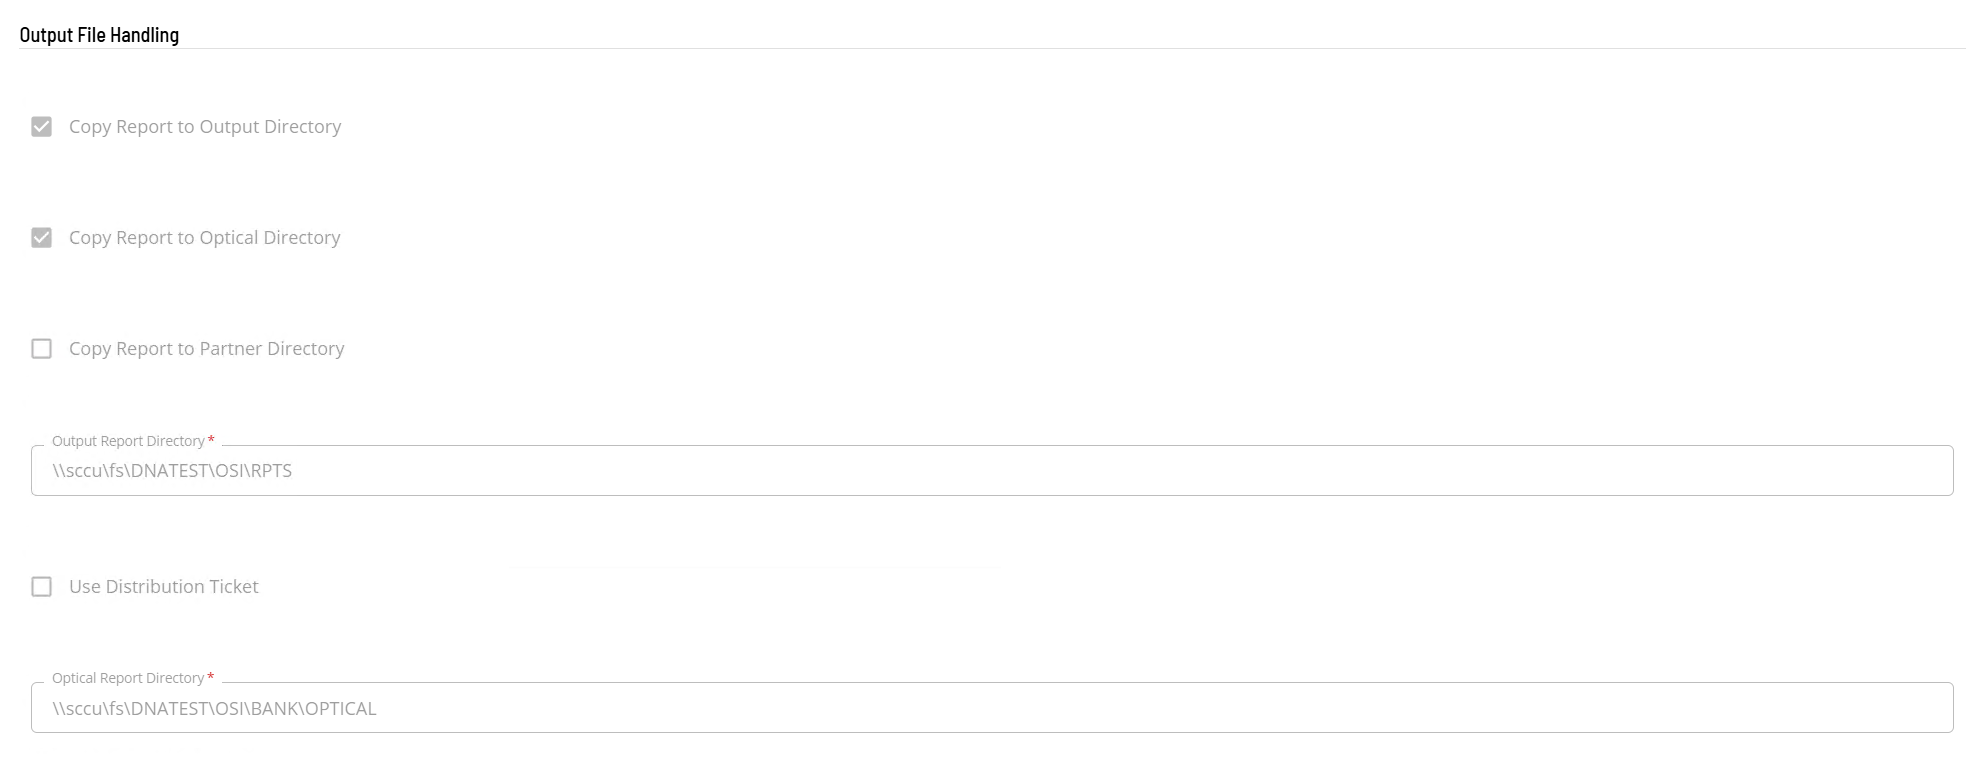
Output File Handling
Copy Report to Output Directory is selected by default. The directory fields appear only after you select the option they belong to.
- To copy the report to an output directory:
- Select Copy Report to Output Directory.
- In the Output Report Directory field enter the directory information.
- To copy the report to an optical directory:
- Select Copy Report to Optical Directory.
- In the Optical Report Directory field enter the directory information.
- To copy the report to partner directories:
- Select Copy Report to Partner Directory.
- In the Partner Report Directories section enter at least one Partner Directory. Use the + Add Item button to add values.
- To use a distribution ticket, select Use Distribution Ticket. This option appears when Copy Report to Output Directory is selected. Complete the following fields:
- Distribution Ticket Directory: the directory information.
- Distribution Schedule: the name of the schedule that the distribution job is added to.
- Distribution Job: the name of the distribution job.
- Distribution Frequency: the frequency assigned to the distribution job.
Save and activate
To save and activate the agent connection, complete the following steps:
- Select Save to save the definition changes.
- Select the Change Communication Status button and select Enable Full Comm to start the connection.