ACS Ease operation
Theme: Configure
Who Is It For? Automation Engineer
What is it?
Once the sma.acs.ACSEase connector is registered with the OpCon system, you can define agents and tasks. All definitions must be created in Solution Manager.
Bundle task types require the EASE-LOCAL, EASE-LOCAL-BUNDLE-RSJEDIT, EASE-LOCAL-BUNDLE-SEQ-FTP, and EASE-LOCAL-BUNDLE-SEQ-PROMPT schedules to be installed on the local OpCon system.
The EASE-LOCAL schedule contains container jobs that inject the EASE-LOCAL-BUNDLE-RSJEDIT, EASE-LOCAL-BUNDLE-SEQ-FTP, and EASE-LOCAL-BUNDLE-SEQ-PROMPT sub-schedules. The sub-schedules contain ACS Ease tasks to run the task sequence for the selected bundle. Each task is submitted to the Ease DataCenter to run. You can view individual job logs and restart individual tasks if needed.
After inserting the schedules, update the sub-schedule tasks to reference the correct Ease agent and an all-days frequency.
The agent definition contains a Debug Mode option for troubleshooting. When selected, all request and response data is logged to the task job log, including the sign-in responses and session tokens for both OpCon systems.
- Use this page to define an ACS Ease agent connection to the Ease DataCenter and create ACS Ease task definitions in Solution Manager.
- Use the bundle task types when a single Ease operation requires running a sequence of tasks, such as RSJ, MONITOR, SEQ, or FTP operations.
Defining ACS Ease connection
The agent definition configures the OpCon Rest-API connections to your local OpCon system and the Ease DataCenter.
Global properties are supported.
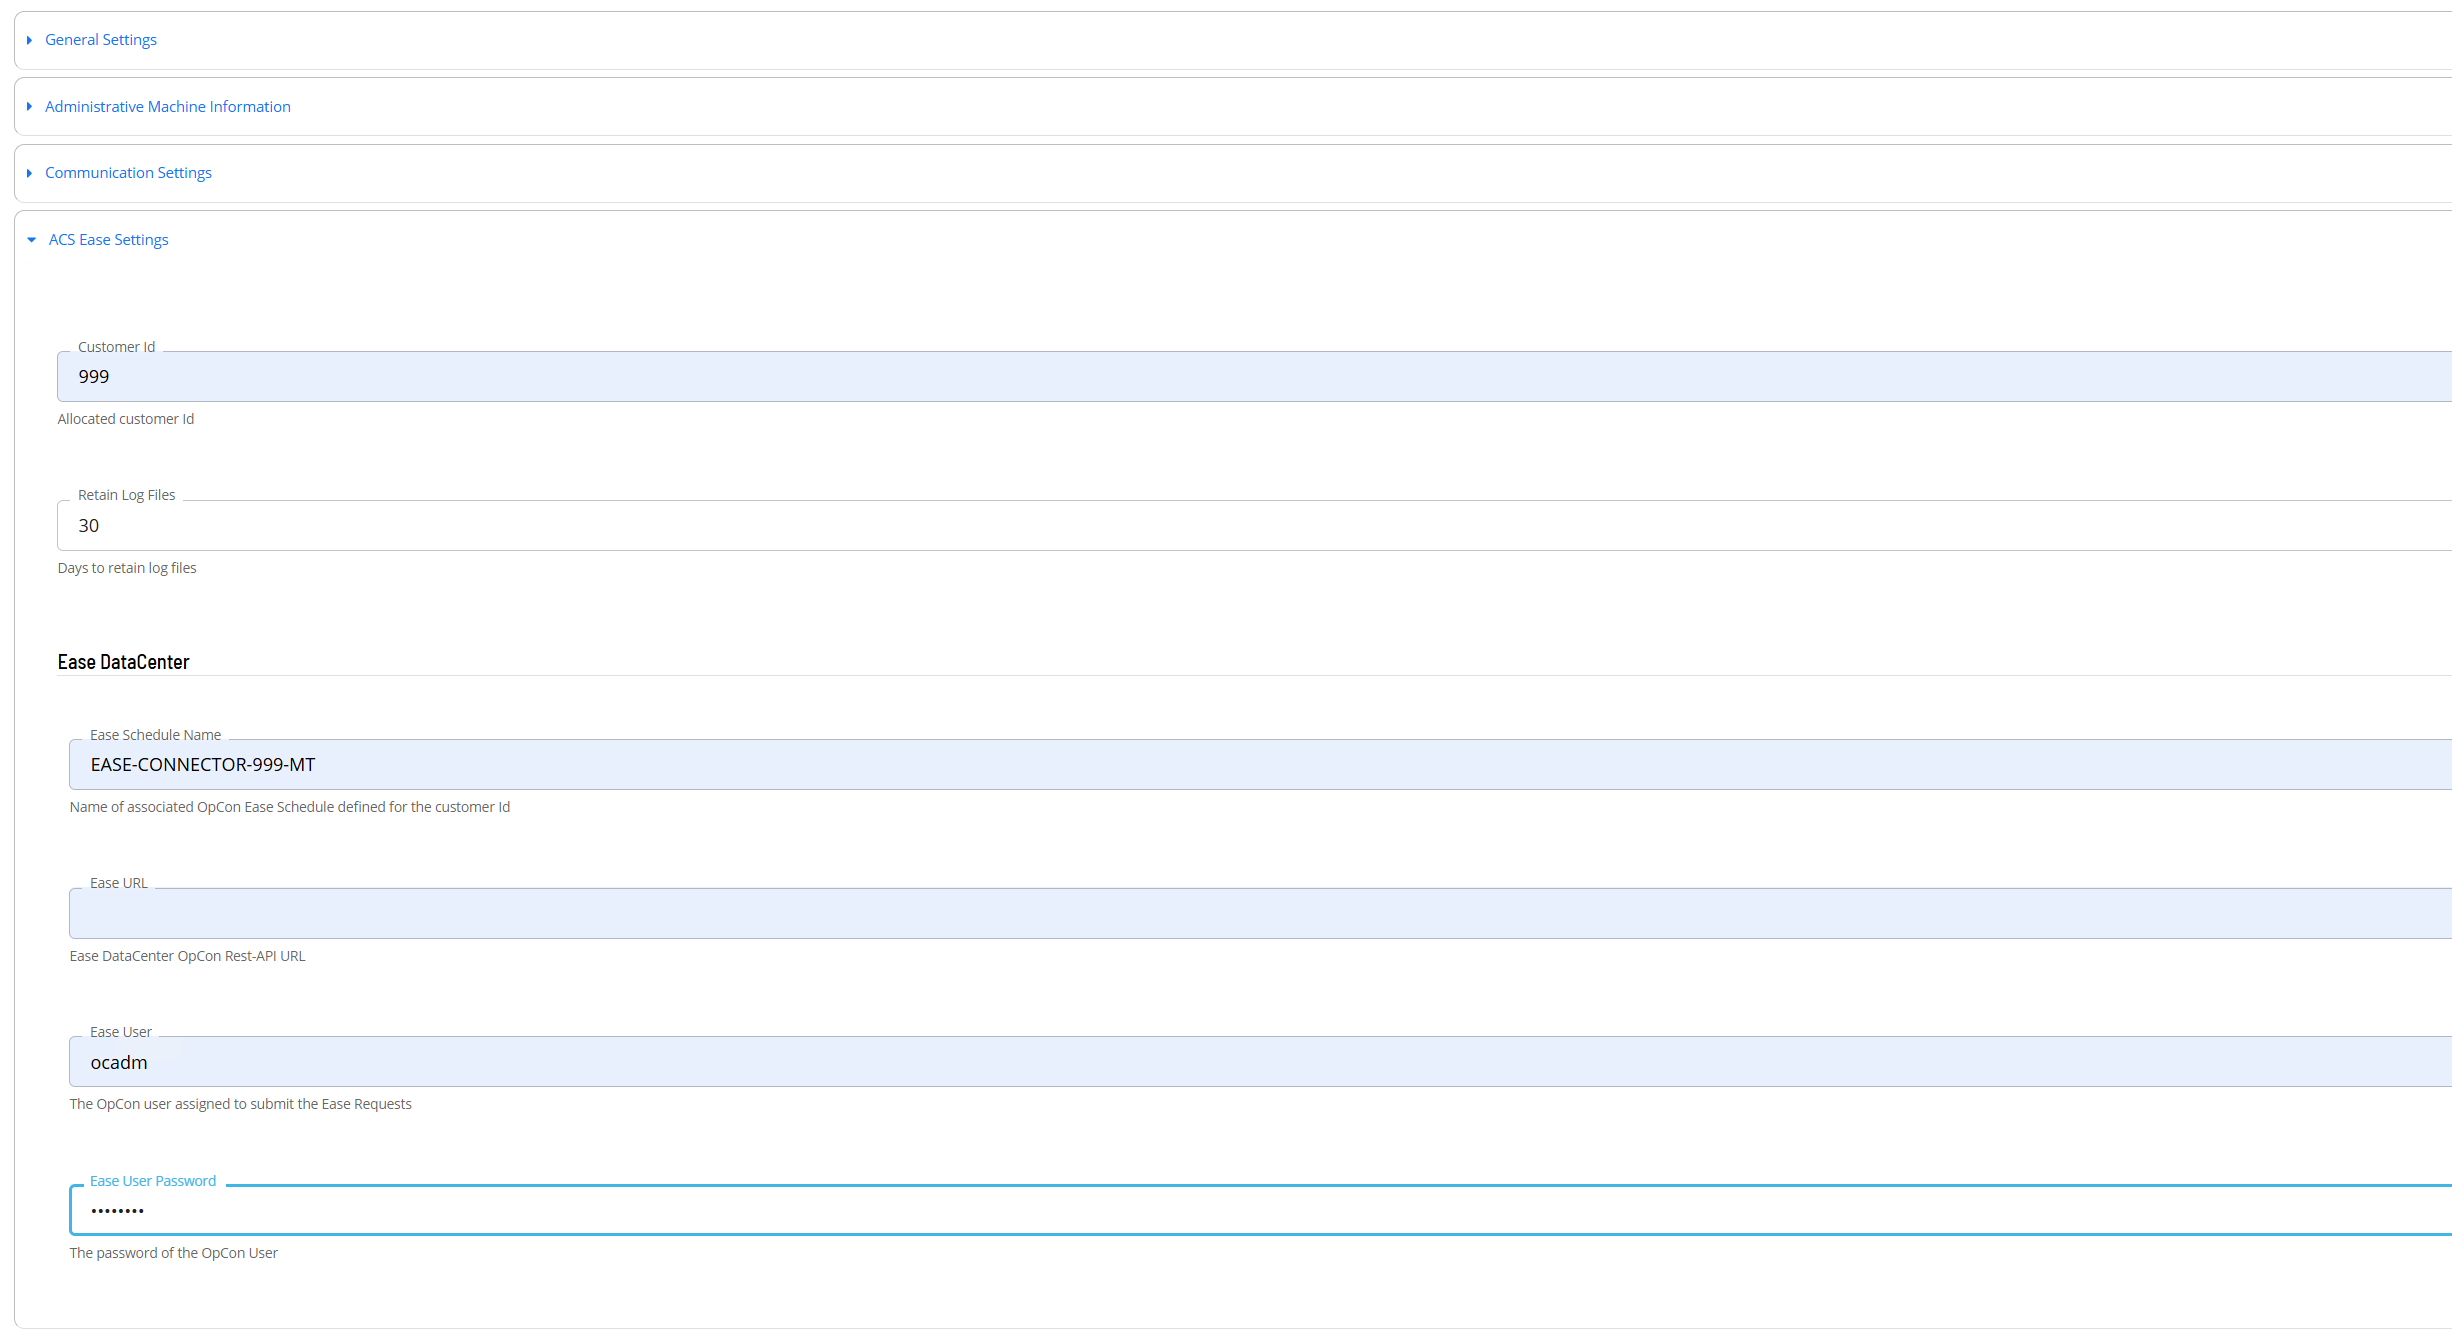
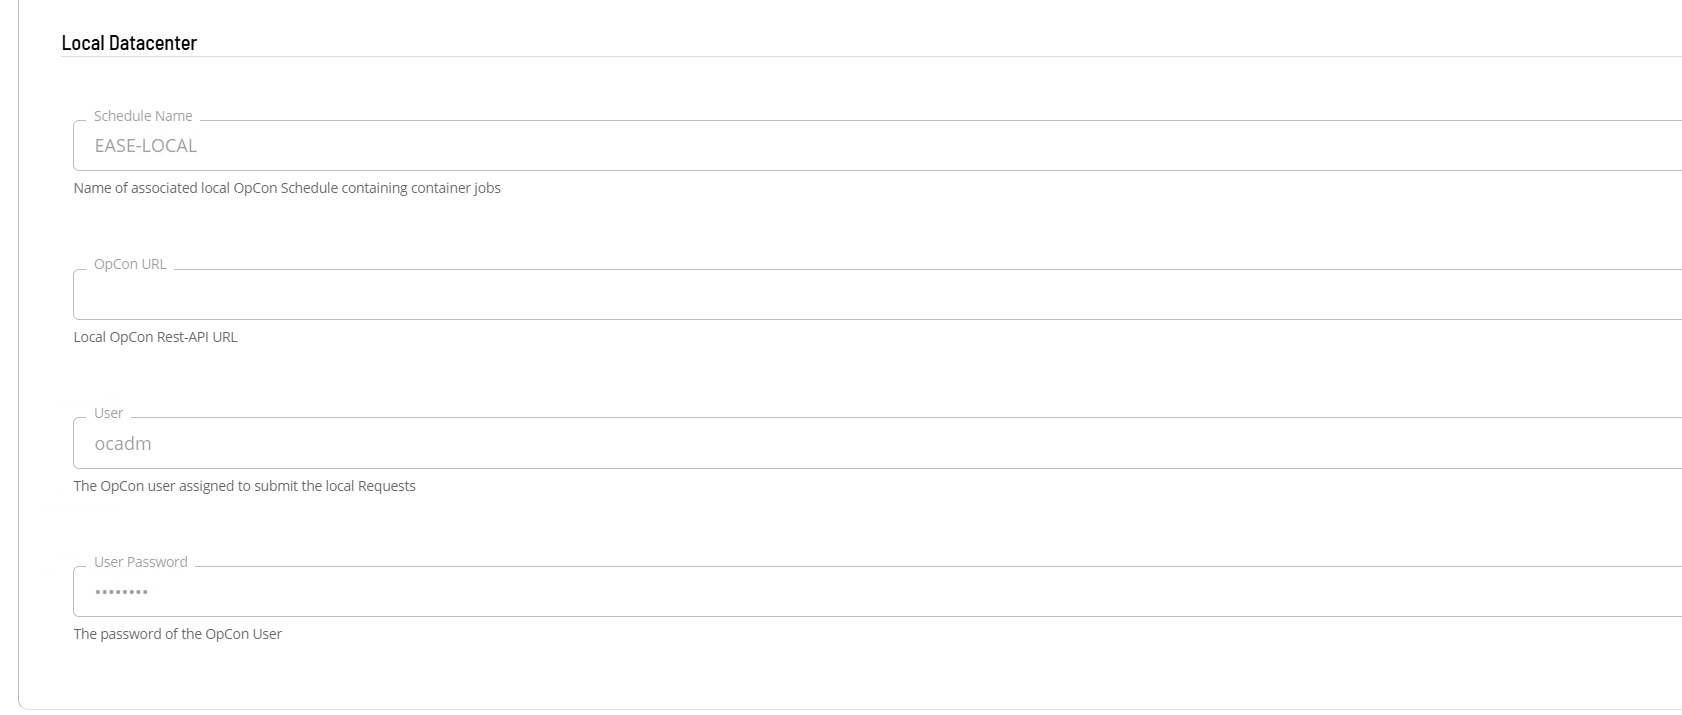
To define an ACS Ease connection, complete the following steps:
-
Open Solution Manager.
-
Select Library.
-
Go to Administration and select Agents.
-
Select +Add to add a new agent definition.
-
Enter the agent details:
- Enter a unique name for the connection.
- Select ACS Ease from the Type list.
- Select General Settings
- Verify that the NetCom Name is set to <Default> or the SMA Relay name if Relay is being used.
- Select ACS Ease Settings
- In the Customer Id field enter customer number provided by the Ease DataCenter.
- In the Retain Log Files field enter a value defining the number of days to retain log files (default is 30 days).
- In the Ease DataCenter section
- In the Ease Schedule Name field enter the name of the schedule defined for your customer Id at the Ease DataCenter.
- In the Ease URL field enter the host and port number provided by the Ease DataCenter (host:port).
- In the Ease User field enter the user name provided by the Ease DataCenter.
- In the Ease User Password field enter the password associated with the provided Ease User.
- In the Local Datacenter section
- In the Schedule Name field enter the name of the local schedule that contains the bundle container jobs (for example, EASE-LOCAL).
- In the OpCon URL field enter the host and port number of the local OpCon system (host:port).
- In the User field enter the user name for the local OpCon system.
- In the User Password field enter the password associated with the local OpCon User.
- Select Debug Mode only when troubleshooting.
-
Select Save.
-
Select Communication Settings. Verify that the Requires XML Escape Sequences: User-Defined field is set to True. If it is not, set the field to True and select Save.
-
Start the connection by selecting the Change Communication Status button and selecting Enable Full Comm.. The agent connection is enabled.
Configuration options
The following settings are available when defining an ACS Ease agent. The Ease DataCenter values are needed to submit tasks, and the Local Datacenter values are needed for bundle tasks and for the SEQ task's local property. Global properties are supported for all value fields.
| Setting | What It Does | Default | Notes |
|---|---|---|---|
| Customer Id | The customer number allocated by the Ease DataCenter | — | — |
| Retain Log Files | Number of days to retain connector log files | 30 | — |
| Ease Schedule Name | The schedule defined for your customer Id at the Ease DataCenter, into which single tasks are injected | — | — |
| Ease URL | Host and port of the Ease DataCenter OpCon Rest-API | — | Format: host:port |
| Ease User | User name allocated by the Ease DataCenter | — | — |
| Ease User Password | Password for the Ease DataCenter user | — | — |
| Schedule Name (Local Datacenter) | The local schedule, such as EASE-LOCAL, into which bundle tasks inject their container jobs | — | Needed for bundle tasks |
| OpCon URL | Host and port of the local OpCon system | — | Format: host:port |
| User | User name for the local OpCon system | — | — |
| User Password | Password for the local OpCon user | — | — |
| NetCom Name | The SMANetCom or SMA Relay instance managing this connection | <Default> | Set to the SMA Relay name if using a Relay installation |
| Requires XML Escape Sequences: User-Defined | Controls XML encoding for task payloads | — | Must be set to True |
| Debug Mode | Logs all request and response data, including sign-in tokens, to the task job log | Off | Enable only during troubleshooting |
Exception handling
The agent does not connect after selecting Enable Full Comm. Enable the Debug Mode option on the agent definition and retry the connection. Review the task job log for request and response details to identify the cause of the failure. Verify that the Ease URL and OpCon URL values are correct and reachable from the OpCon server.
A task fails at once with "Daily Schedule ... ON HOLD", "WAITING" or "COMPLETE exiting". The target schedule for today is on hold, has not started, or has already finished. Release or rebuild the schedule (the Ease Schedule Name at the Ease DataCenter for single tasks, the local Schedule Name for bundle tasks) and rerun the task. See When a task runs.
Tasks submitted to the Ease DataCenter fail or return unexpected results. Verify that the Requires XML Escape Sequences: User-Defined field in Communication Settings is set to True. If not, update the field, save the agent definition, and resubmit the task.
Bundle tasks fail to run. Verify that the EASE-LOCAL, EASE-LOCAL-BUNDLE-RSJEDIT, EASE-LOCAL-BUNDLE-SEQ-FTP, and EASE-LOCAL-BUNDLE-SEQ-PROMPT schedules are installed on the local OpCon system. Verify that the tasks in each sub-schedule reference the correct Ease agent and have an all-days frequency definition assigned.
Defining tasks
The ACS Ease Connection supports the following task types:
| Task Type | Description |
|---|---|
| BUNDLE-RSJEDIT | MONITOR and RSJEDIT tasks |
| BUNDLE-SEQ-FTP | SEQ, COPY-RPT-OUT and RUN-FTP-OUT tasks |
| BUNDLE-SEQ-PROMPT | SEQ and PROMPT tasks |
| COPY-DATA-TO-LTRFILE | Copy outgoing Data File to Letter Files for FTP |
| COPY-RENAME-LTRFILE-OUT | Copy or Rename Letter File for FTP |
| COPY-RPT-OUT | Copy Report to Letter Files for FTP |
| FILEPERMS | Update Letter File Privileges to 774 |
| MONITOR | File Monitor for Incoming File |
| MOVE-LTRFILE-TO-DATA | Move incoming Letter File to Data Files |
| PROMPT | Answer a Single Prompt |
| PROMPTSEQ | Answer a Single Prompt with a SEQ |
| RUN-FTP-OUT | FTP Letter File off Symitar |
| RENAME-LTRFILE-IN | Rename Letter File Removing Prefix |
| RESET | Reset a Single Prompt |
| RSJ | Run Symitar Job (single-threaded) |
| RSJEDIT | Runs Symitar Job with Edit File |
| RSJMULTI | Run Symitar Job (multi-threaded) |
| SEQ | Collect the SEQ of a Report and store it in a global property on the local OpCon system |
| SEQ-SEND | Copy Specified SEQ to Reports for FTP |
| TRANSLATE2COMMAS | Answer a Single Prompt containing commas |
Defining tasks only requires providing the values associated with the specific task. It is possible to use global properties when defining tasks.
When a task runs
When an ACS Ease task starts, the connector checks today's daily schedule, using the date of the server that runs SMANetCom or the relay. Single tasks use the Ease Schedule Name at the Ease DataCenter, and bundle tasks use the local Schedule Name. If that schedule is not in the daily tables, or is on hold, waiting or finished OK, the task fails at once.
The connector then injects a job into that schedule and follows it. The task finishes when the injected job finishes OK, and fails when the injected job fails or is cancelled. For any other status, the task keeps running.
The Identifier is optional for every task type except SEQ. It is sent with the injected job so that several instances of the same task type can run at the same time.
Killing an ACS Ease job in OpCon does not stop the job at the Ease DataCenter, or the bundle's container job on the local system. Stop it there if needed.
BUNDLE-RSJEDIT Task
- Open Solution Manager.
- From the Home page select Library
- From the Administration Menu select Master Jobs.
- Select +Add to add a new master job definition.
- Fill in the task details.
- Select the Schedule name from the list.
- In the Name field enter a unique name for the task within the schedule.
- Select ACS Ease from the Job Type list.
- Select BUNDLE-RSJEDIT : MONITOR and RSJEDIT tasks from the Task Type list.
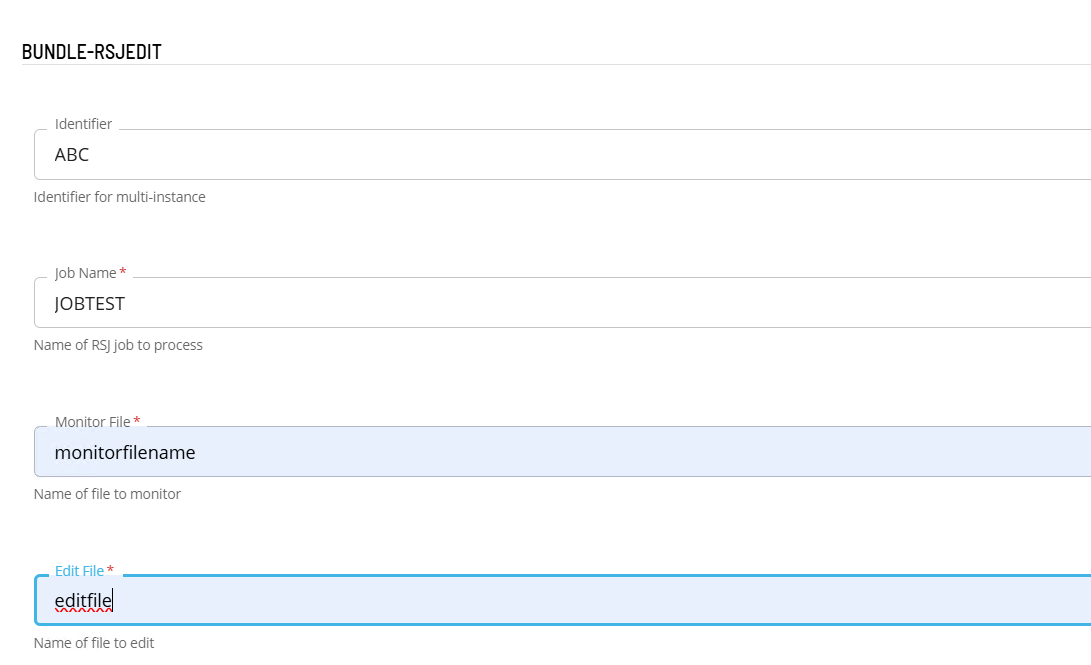
Enter details for Task Type BUNDLE-RSJEDIT.
- Select the Task Details button.
- In the Integration Selection section, select the primary integration which is an ACSEase connection previously defined.
- In the TaskConfiguration section
- In the Identifier field enter a unique identifier for the task.
- In the Job Name field enter the name of the RSJ job associated with the RSJ task.
- In the Monitor File field enter the monitor file name associated with the MONITOR task.
- In the Edit File field enter the edit file name associated with the RSJ task.
- Select Save. The task definition is saved.
BUNDLE-SEQ-FTP Task
- Open Solution Manager.
- From the Home page select Library
- From the Administration Menu select Master Jobs.
- Select +Add to add a new master job definition.
- Fill in the task details.
- Select the Schedule name from the list.
- In the Name field enter a unique name for the task within the schedule.
- Select ACS Ease from the Job Type list.
- Select BUNDLE-SEQ-FTP : SEQ, COPY-RPT-OUT and RUN-FTP-OUT tasks from the Task Type list.
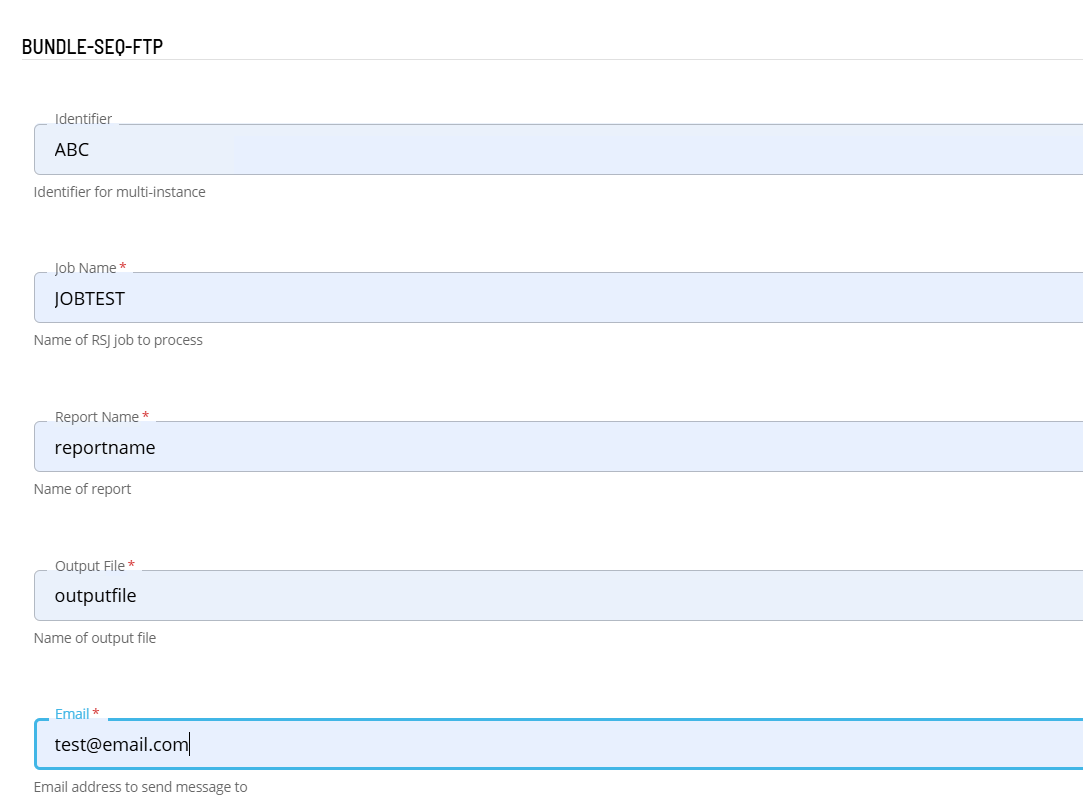
Enter details for Task Type BUNDLE-SEQ-FTP.
- Select the Task Details button.
- In the Integration Selection section, select the primary integration which is an ACSEase connection previously defined.
- In the TaskConfiguration section
- In the Identifier field enter a unique identifier for the task.
- In the Job Name field enter the name of the RSJ job associated with the SEQ task.
- In the Report Name field enter the report name associated with the SEQ task.
- In the Output File field enter the output file name associated with the COPY-RPT-OUT and RUN-FTP-OUT tasks.
- In the Email field enter an email address that receives notification when the transfer is complete.
- Select Save. The task definition is saved.
BUNDLE-SEQ-PROMPT Task
- Open Solution Manager.
- From the Home page select Library
- From the Administration Menu select Master Jobs.
- Select +Add to add a new master job definition.
- Fill in the task details.
- Select the Schedule name from the list.
- In the Name field enter a unique name for the task within the schedule.
- Select ACS Ease from the Job Type list.
- Select BUNDLE-SEQ-PROMPT : SEQ, and PROMPT tasks from the Task Type list.
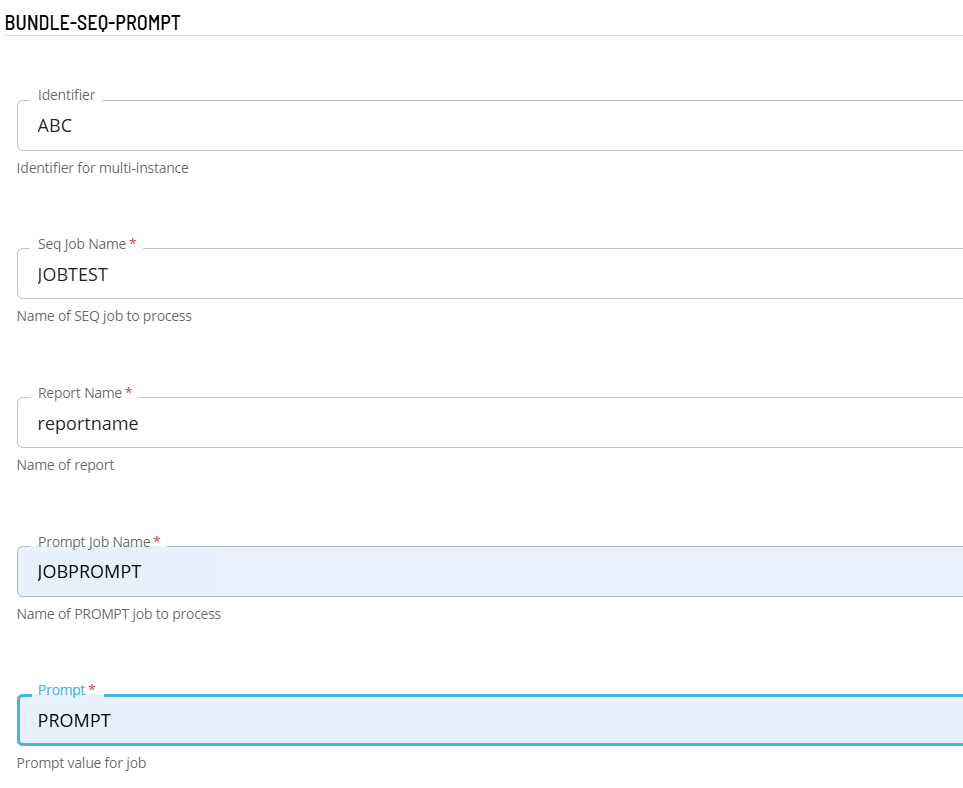
Enter details for Task Type BUNDLE-SEQ-PROMPT.
- Select the Task Details button.
- In the Integration Selection section, select the primary integration which is an ACSEase connection previously defined.
- In the TaskConfiguration section
- In the Identifier field enter a unique identifier for the task.
- In the Seq Job Name field enter the name of the RSJ job associated with the SEQ task.
- In the Report Name field enter the report name associated with the SEQ task.
- In the Prompt Job Name field enter the name of the RSJ job associated with this PROMPTSEQ task.
- In the Prompt field enter prompt to submit.
- Select Save. The task definition is saved.
COPY-DATA-TO-LTRFILE Task
- Open Solution Manager.
- From the Home page select Library
- From the Administration Menu select Master Jobs.
- Select +Add to add a new master job definition.
- Fill in the task details.
- Select the Schedule name from the list.
- In the Name field enter a unique name for the task within the schedule.
- Select ACS Ease from the Job Type list.
- Select COPY-DATA-TO-LTRFILE : Copy outgoing Data File to Letter Files for FTP from the Task Type list.
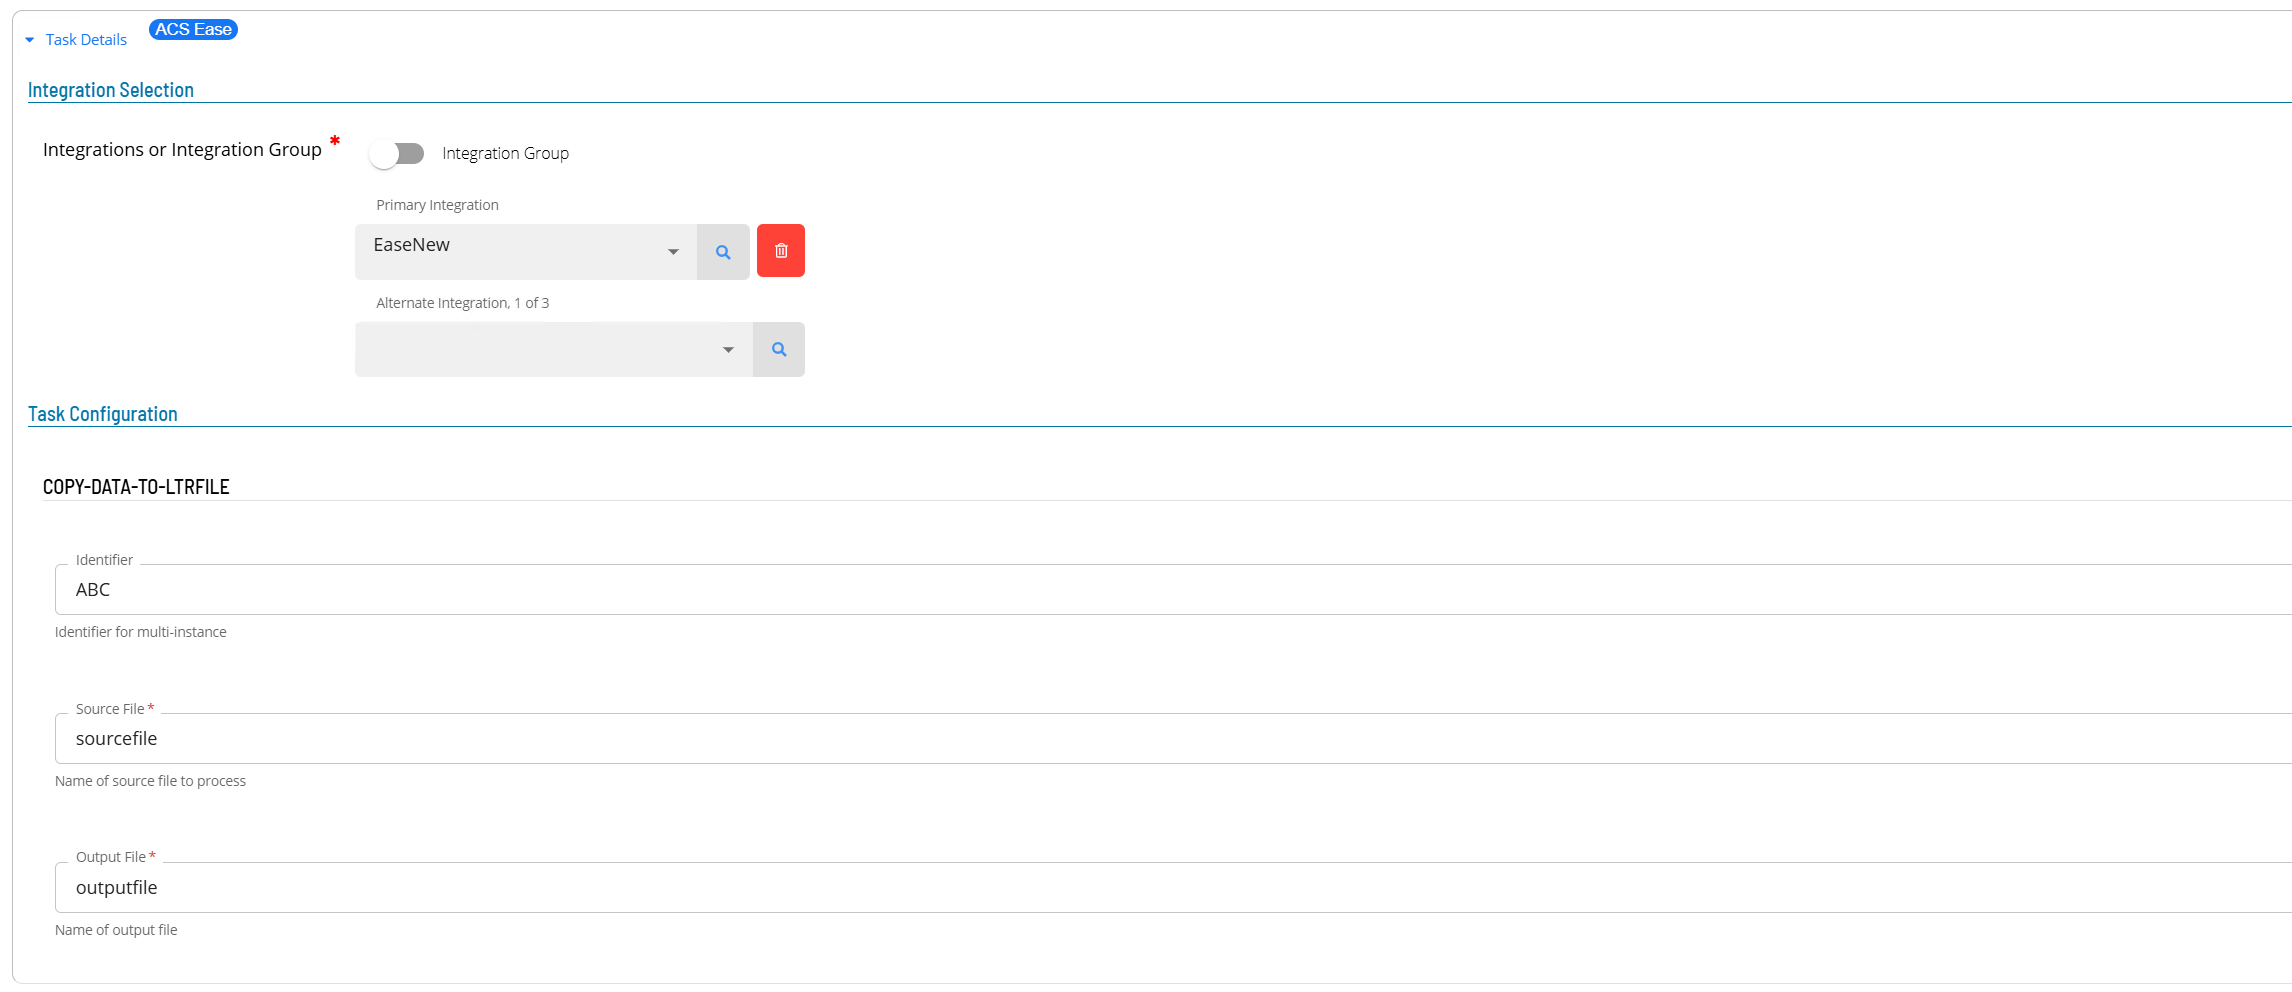
Enter details for Task Type COPY-DATA-TO-LTRFILE.
- Select the Task Details button.
- In the Integration Selection section, select the primary integration which is an ACSEase connection previously defined.
- In the TaskConfiguration section
- In the Identifier field enter a unique identifier for the task.
- In the Source File field enter the source file name associated with the task.
- In the Output File field enter the output file name associated with the task.
- Select Save. The task definition is saved.
COPY-RENAME-LTRFILE-OUT Task
- Open Solution Manager.
- From the Home page select Library
- From the Administration Menu select Master Jobs.
- Select +Add to add a new master job definition.
- Fill in the task details.
- Select the Schedule name from the list.
- In the Name field enter a unique name for the task within the schedule.
- Select ACS Ease from the Job Type list.
- Select COPY-RENAME-LTRFILE-OUT : Copy or Rename Letter File for FTP from the Task Type list.
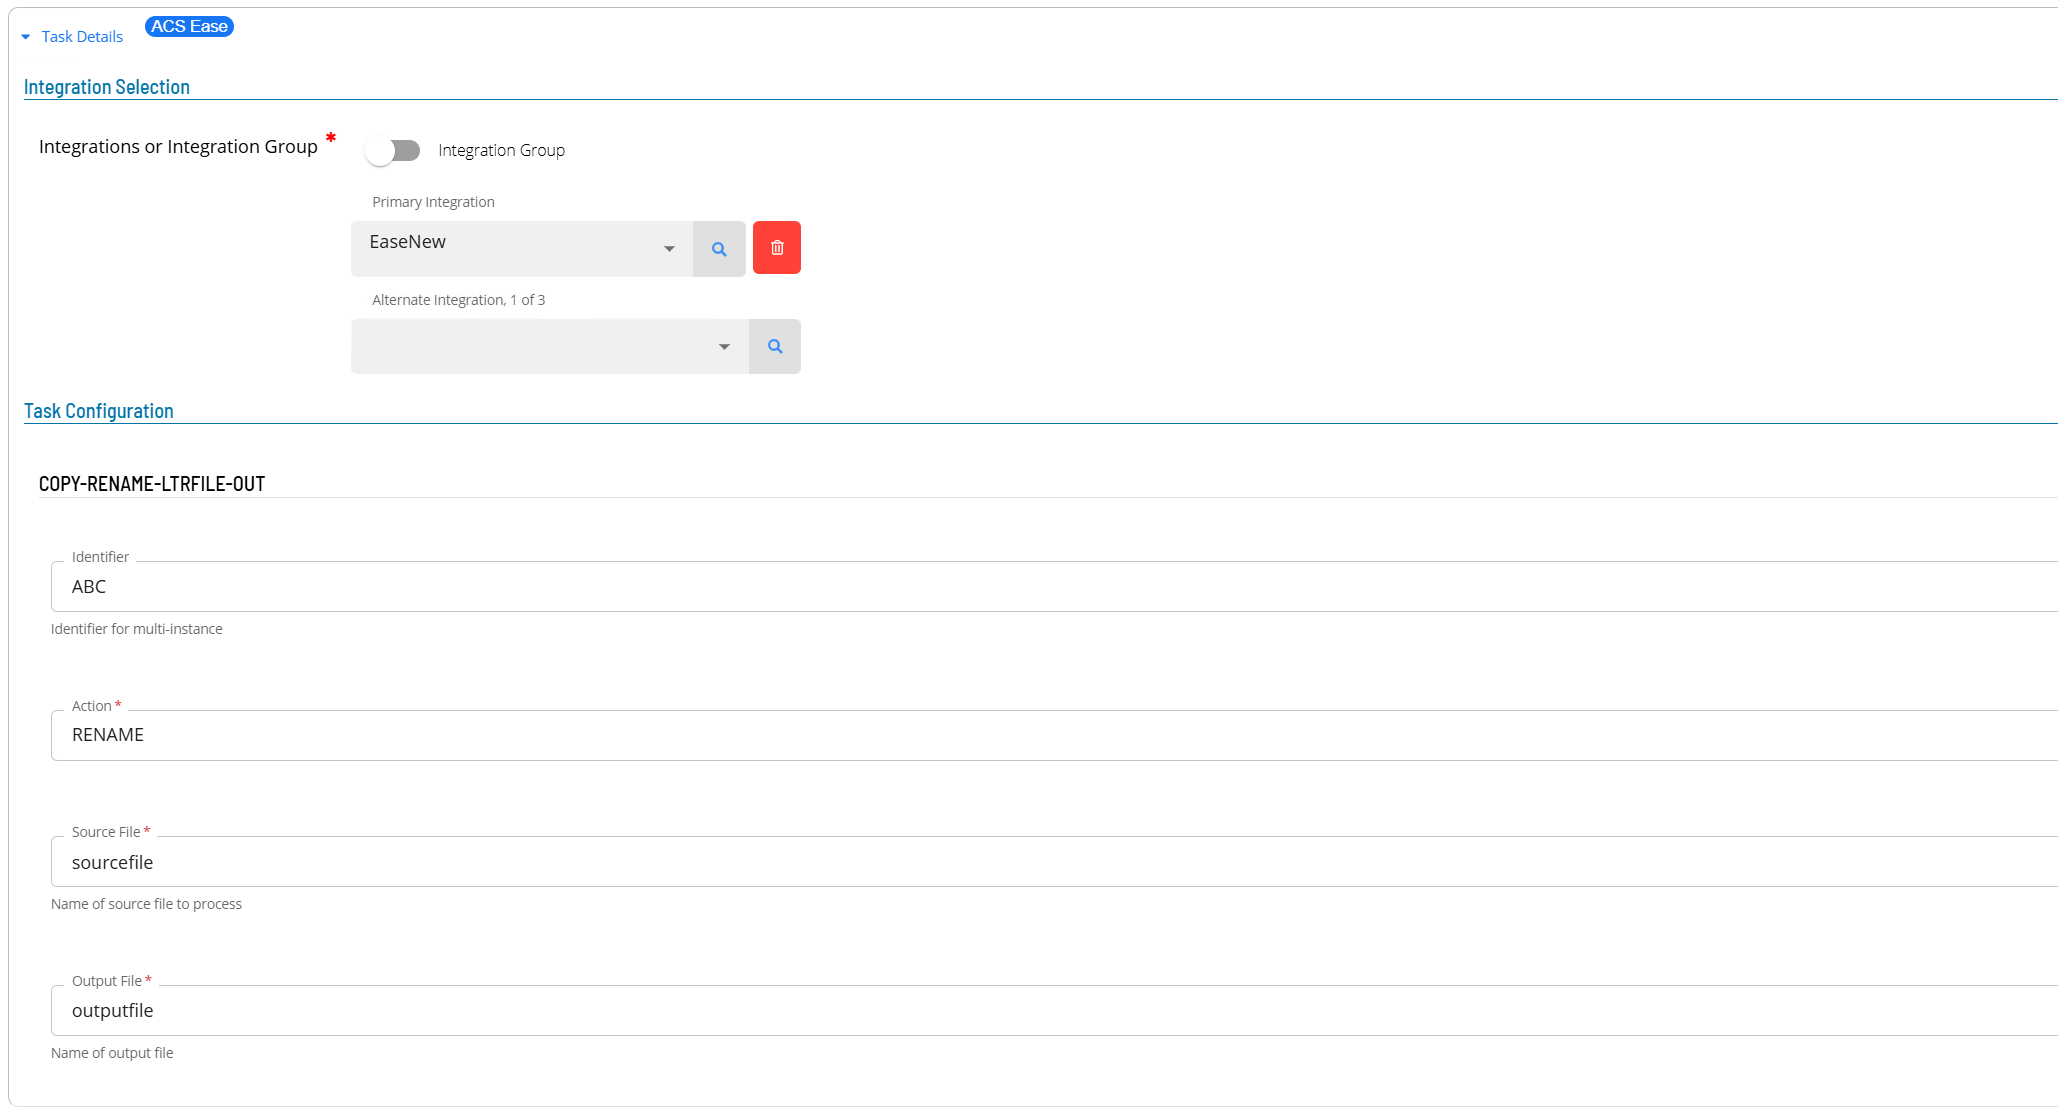
Enter details for Task Type COPY-RENAME-LTRFILE-OUT.
- Select the Task Details button.
- In the Integration Selection section, select the primary integration which is an ACSEase connection previously defined.
- In the TaskConfiguration section
- In the Identifier field enter a unique identifier for the task.
- select an Action from the Action list.
- In the Source File field enter the source file name associated with the task.
- In the Output File field enter the output file name associated with the task.
- Select Save. The task definition is saved.
COPY-RPT-OUT Task
- Open Solution Manager.
- From the Home page select Library
- From the Administration Menu select Master Jobs.
- Select +Add to add a new master job definition.
- Fill in the task details.
- Select the Schedule name from the list.
- In the Name field enter a unique name for the task within the schedule.
- Select ACS Ease from the Job Type list.
- Select COPY-RPT-OUT : Copy Report to Letter Files for FTP from the Task Type list.
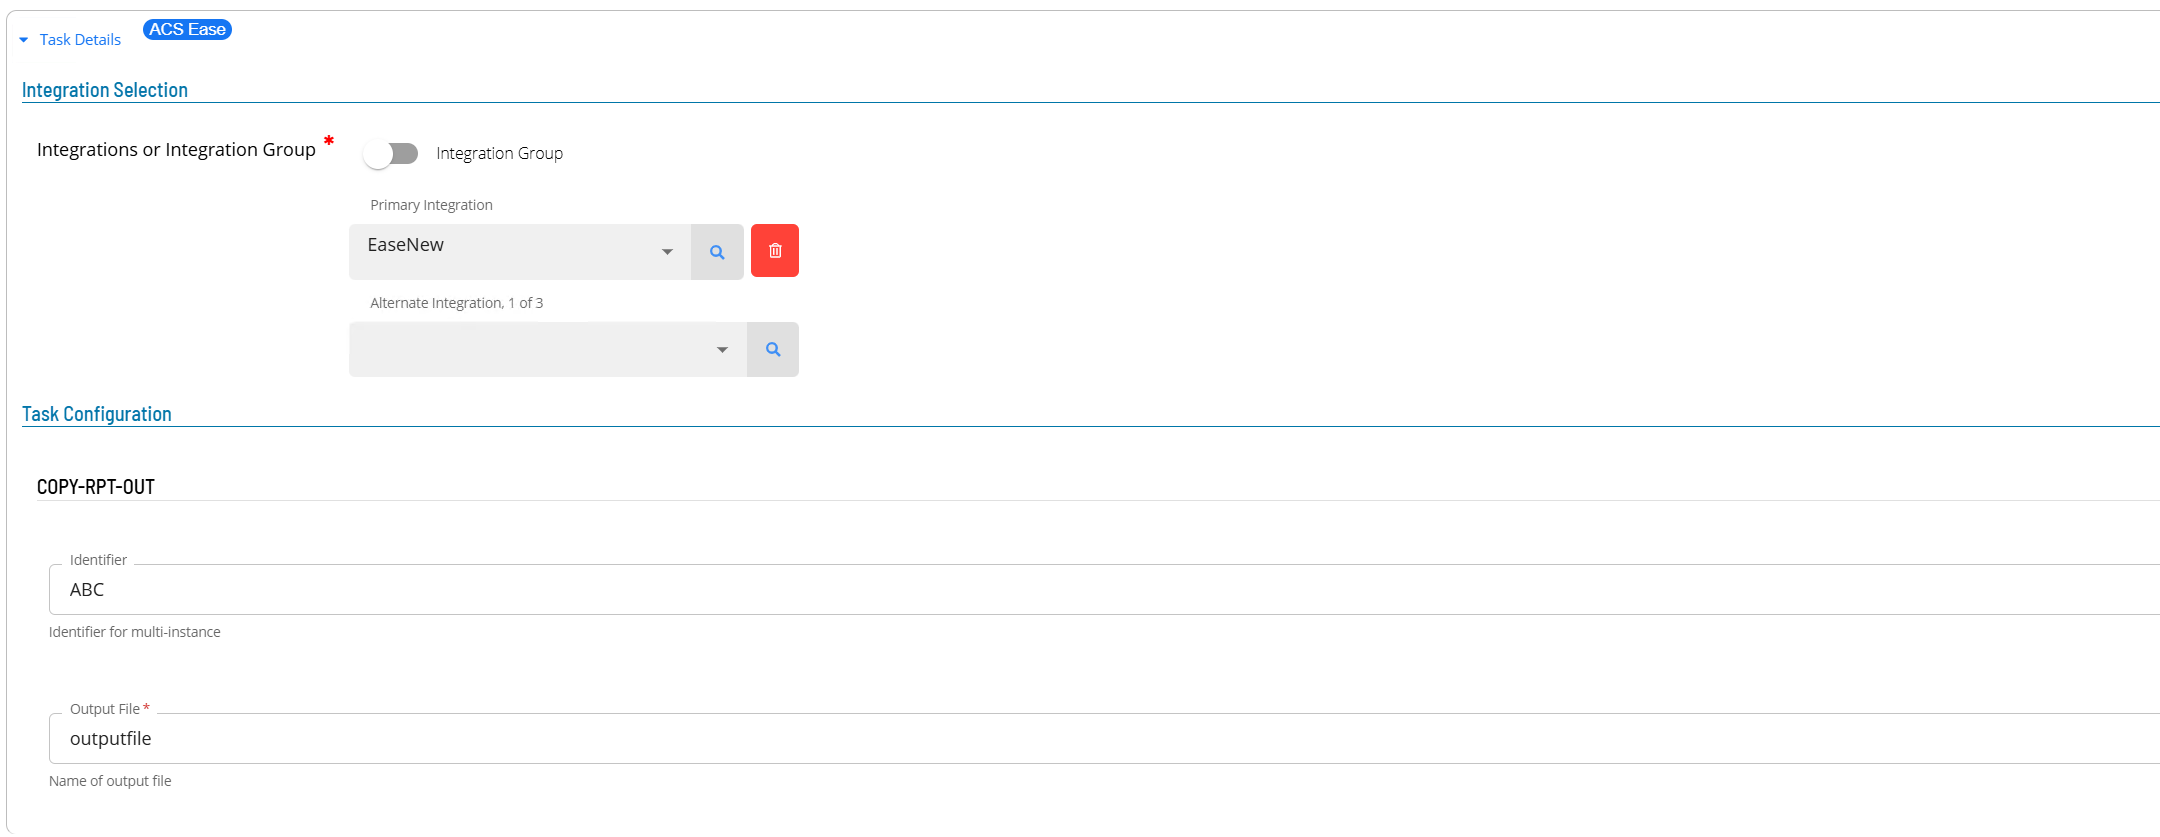
Enter details for Task Type COPY-RPT-OUT.
- Select the Task Details button.
- In the Integration Selection section, select the primary integration which is an ACSEase connection previously defined.
- In the TaskConfiguration section
- In the Identifier field enter a unique identifier for the task.
- In the Output File field enter the output file name associated with the task.
- Select Save. The task definition is saved.
FILEPERMS Task
- Open Solution Manager.
- From the Home page select Library
- From the Administration Menu select Master Jobs.
- Select +Add to add a new master job definition.
- Fill in the task details.
- Select the Schedule name from the list.
- In the Name field enter a unique name for the task within the schedule.
- Select ACS Ease from the Job Type list.
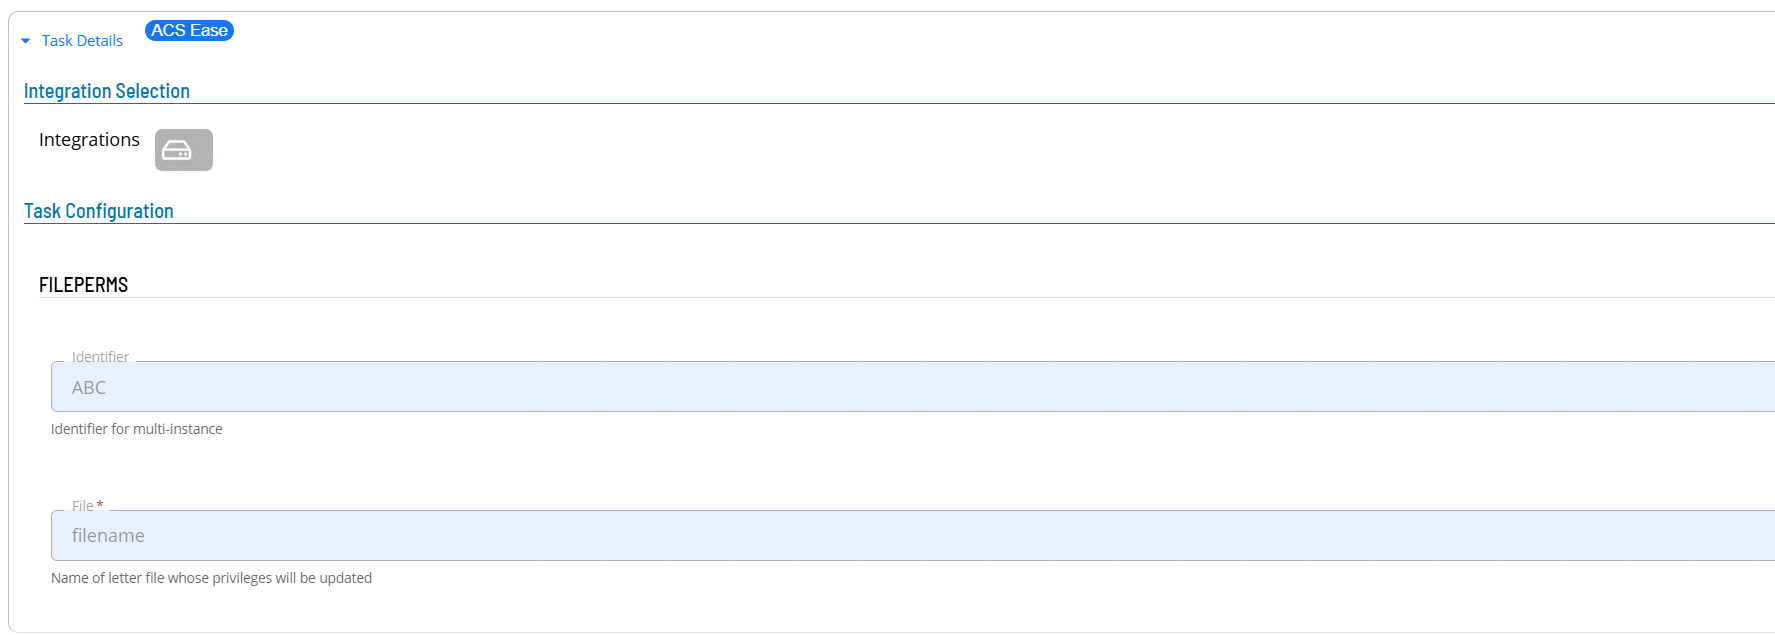
- Select FILEPERMS : Update Letter File Privileges to 774 from the Task Type list.
Enter details for Task Type FILEPERMS.
- Select the Task Details button.
- In the Integration Selection section, select the primary integration which is an ACSEase connection previously defined.
- In the TaskConfiguration section
- In the Identifier field enter a unique identifier for the task.
- In the File field enter the letter file name whose privileges are updated.
- Select Save. The task definition is saved.
MONITOR Task
- Open Solution Manager.
- From the Home page select Library
- From the Administration Menu select Master Jobs.
- Select +Add to add a new master job definition.
- Fill in the task details.
- Select the Schedule name from the list.
- In the Name field enter a unique name for the task within the schedule.
- Select ACS Ease from the Job Type list.
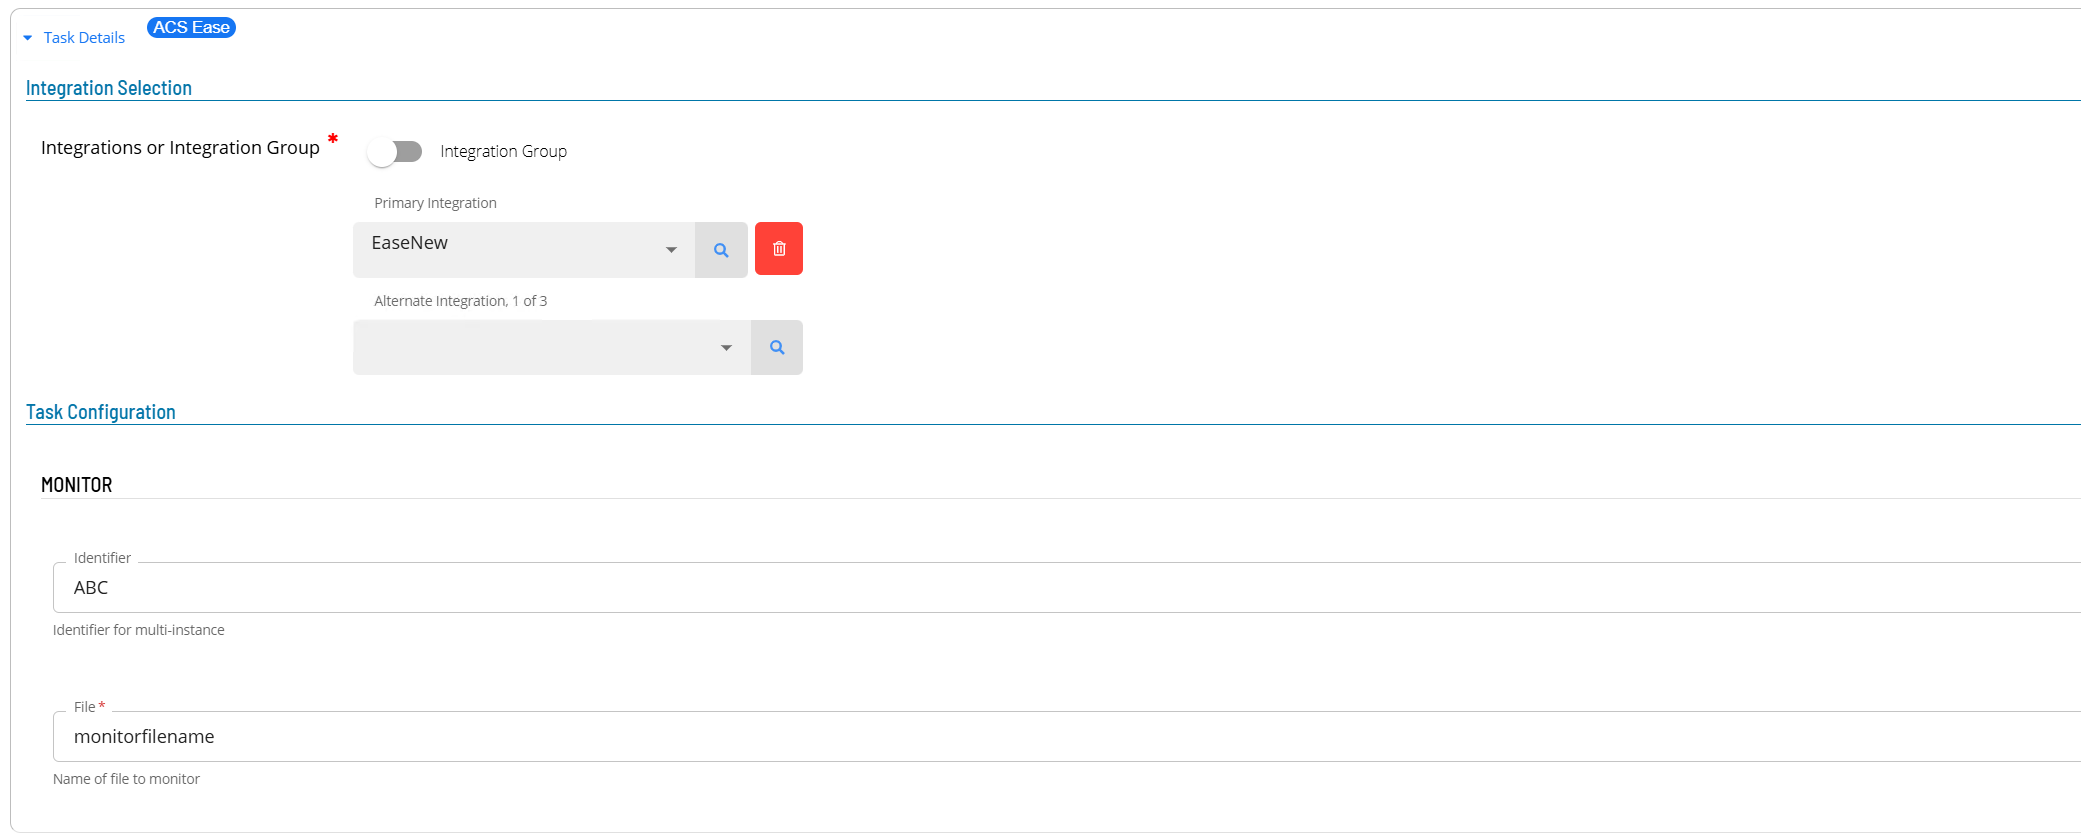
- Select MONITOR : File Monitor for Incoming File from the Task Type list.
Enter details for Task Type MONITOR.
- Select the Task Details button.
- In the Integration Selection section, select the primary integration which is an ACSEase connection previously defined.
- In the TaskConfiguration section
- In the Identifier field enter a unique identifier for the task.
- In the File field enter the monitor file name associated with the task.
- Select Save. The task definition is saved.
MOVE-LTRFILE-TO-DATA Task
- Open Solution Manager.
- From the Home page select Library
- From the Administration Menu select Master Jobs.
- Select +Add to add a new master job definition.
- Fill in the task details.
- Select the Schedule name from the list.
- In the Name field enter a unique name for the task within the schedule.
- Select ACS Ease from the Job Type list.
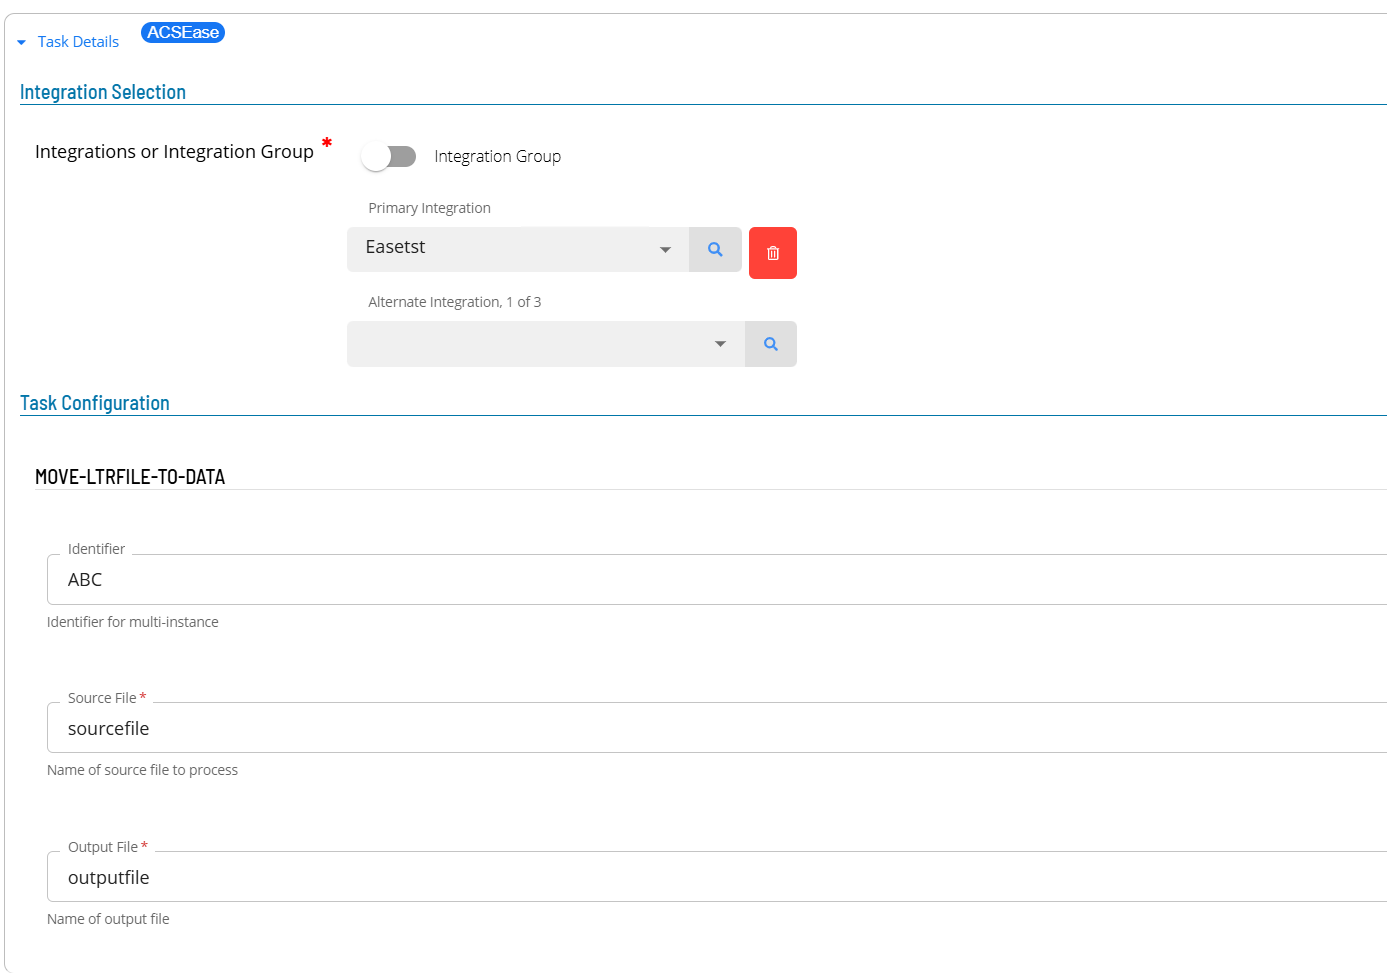
- Select MOVE-LTRFILE-TO-DATA : Move incoming Letter File to Data Files from the Task Type list.
Enter details for Task Type MOVE-LTRFILE-TO-DATA.
- Select the Task Details button.
- In the Integration Selection section, select the primary integration which is an ACSEase connection previously defined.
- In the TaskConfiguration section
- In the Identifier field enter a unique identifier for the task.
- In the Source File field enter the source file name associated with the task.
- In the Output File field enter the output file name associated with the task.
- Select Save. The task definition is saved.
PROMPT Task
- Open Solution Manager.
- From the Home page select Library
- From the Administration Menu select Master Jobs.
- Select +Add to add a new master job definition.
- Fill in the task details.
- Select the Schedule name from the list.
- In the Name field enter a unique name for the task within the schedule.
- Select ACS Ease from the Job Type list.
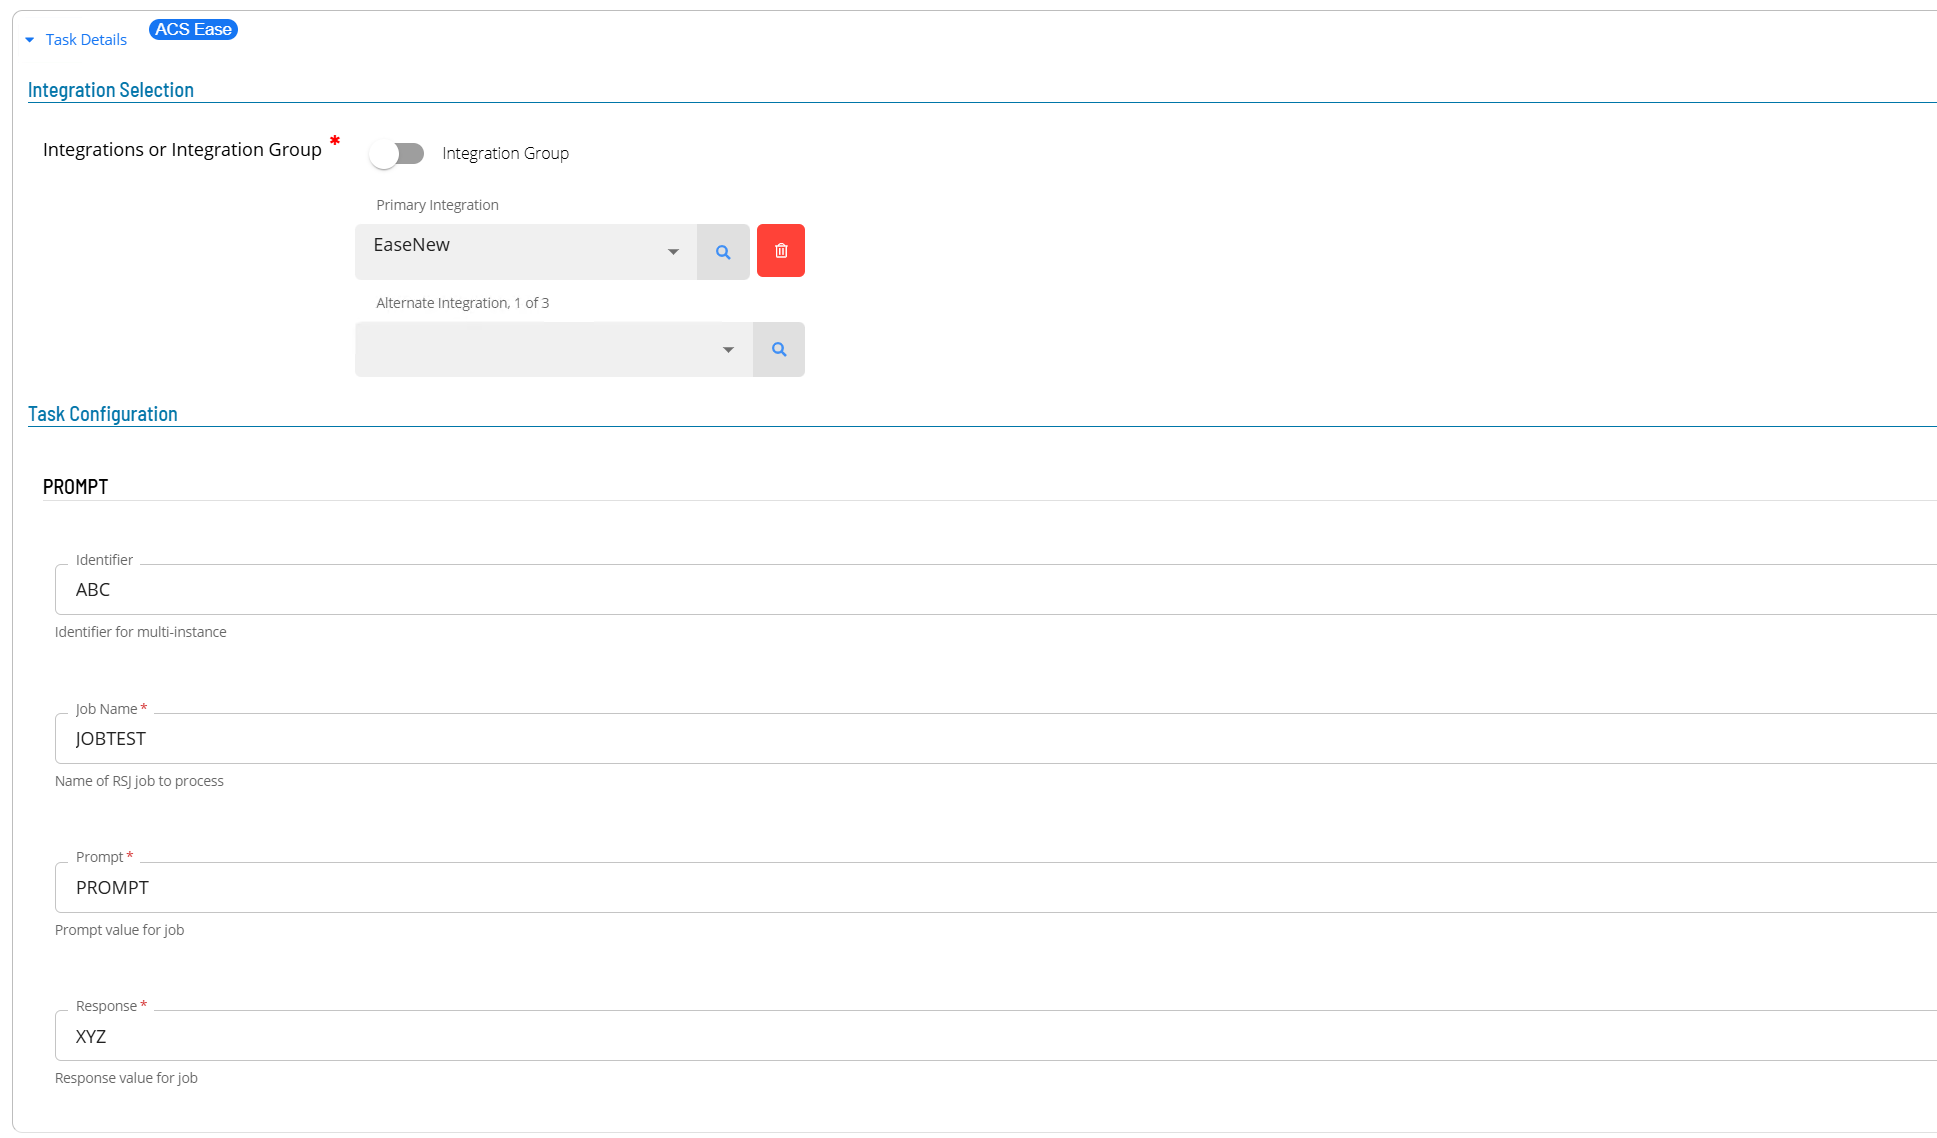
- Select PROMPT : Answer a Single Prompt from the Task Type list.
Enter details for Task Type PROMPT.
- Select the Task Details button.
- In the Integration Selection section, select the primary integration which is an ACSEase connection previously defined.
- In the TaskConfiguration section
- In the Identifier field enter a unique identifier for the task.
- In the Job Name field enter the name of the RSJ job associated with this request.
- In the Prompt field enter prompt.
- In the Response field enter the response to the associated prompt.
- Select Save. The task definition is saved.
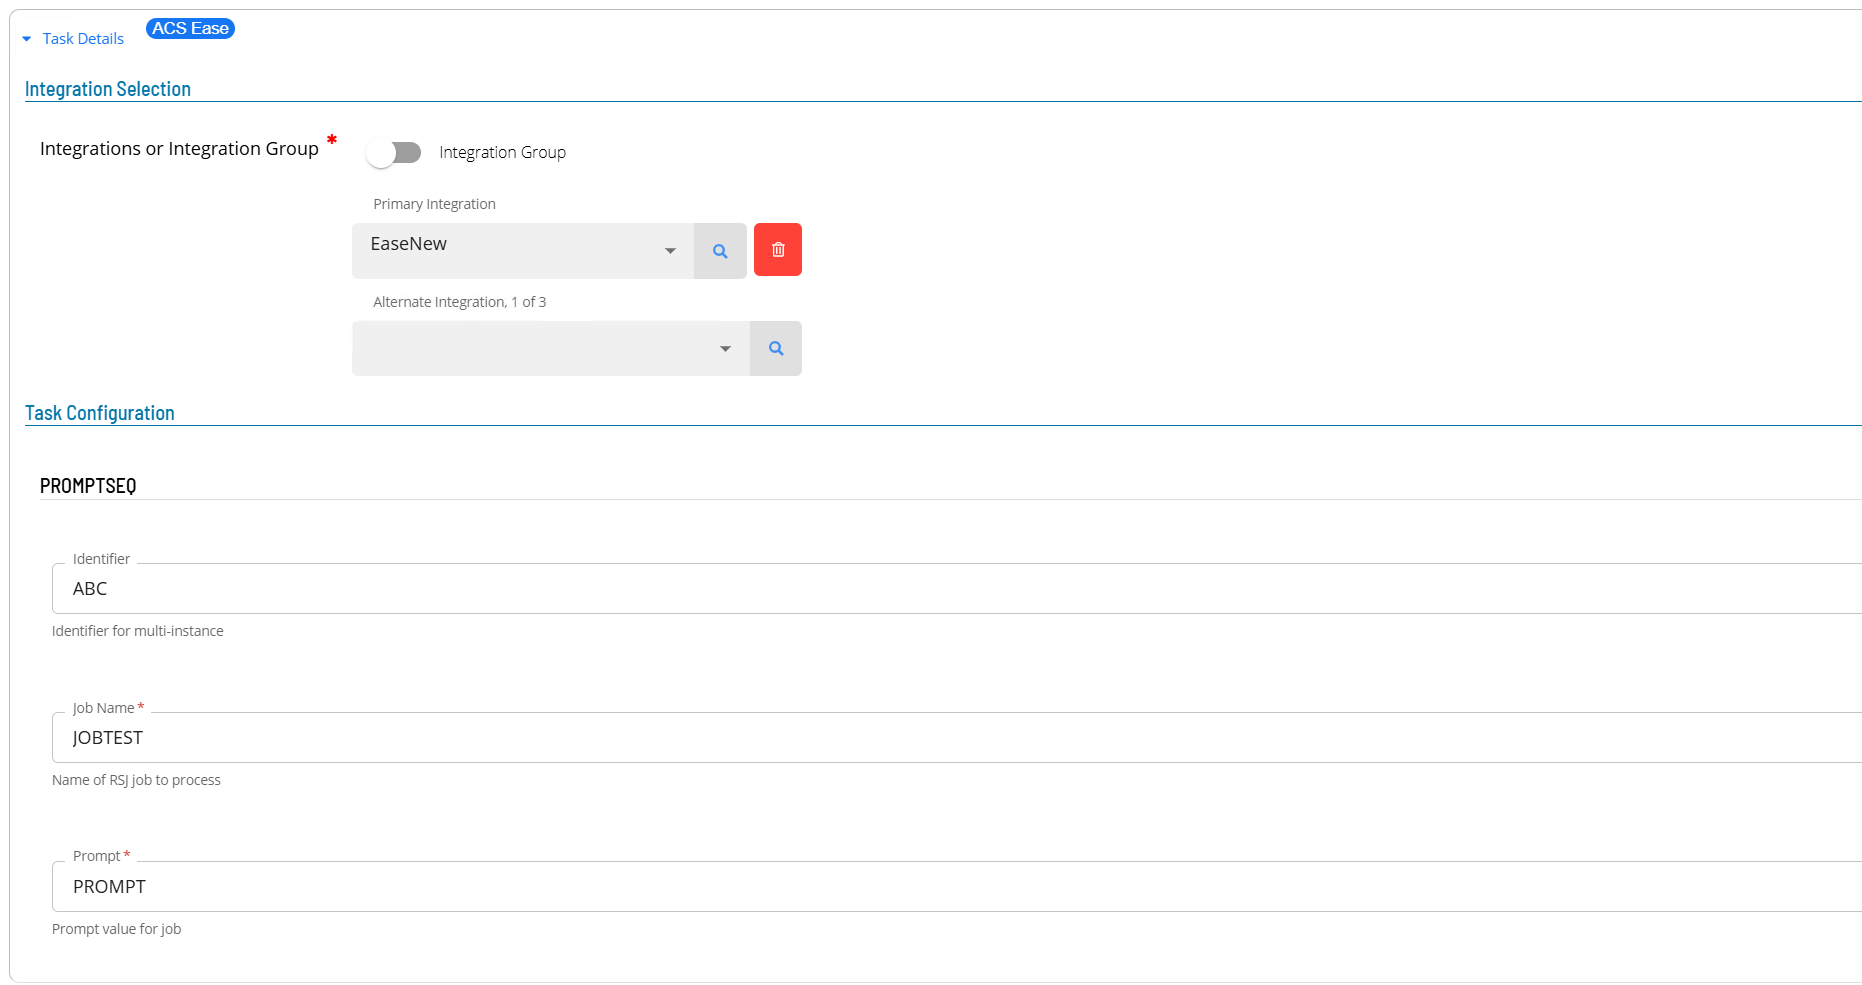
PROMPTSEQ Task
- Open Solution Manager.
- From the Home page select Library
- From the Administration Menu select Master Jobs.
- Select +Add to add a new master job definition.
- Fill in the task details.
- Select the Schedule name from the list.
- In the Name field enter a unique name for the task within the schedule.
- Select ACS Ease from the Job Type list.
- Select PROMPTSEQ : Answer a Single Prompt with a SEQ from the Task Type list.
Enter details for Task Type PROMPTSEQ.
- Select the Task Details button.
- In the Integration Selection section, select the primary integration which is an ACSEase connection previously defined.
- In the TaskConfiguration section
- In the Identifier field enter a unique identifier for the task.
- In the Job Name field enter the name of the RSJ job associated with this request.
- In the Prompt field enter prompt to submit.
- Select Save. The task definition is saved.
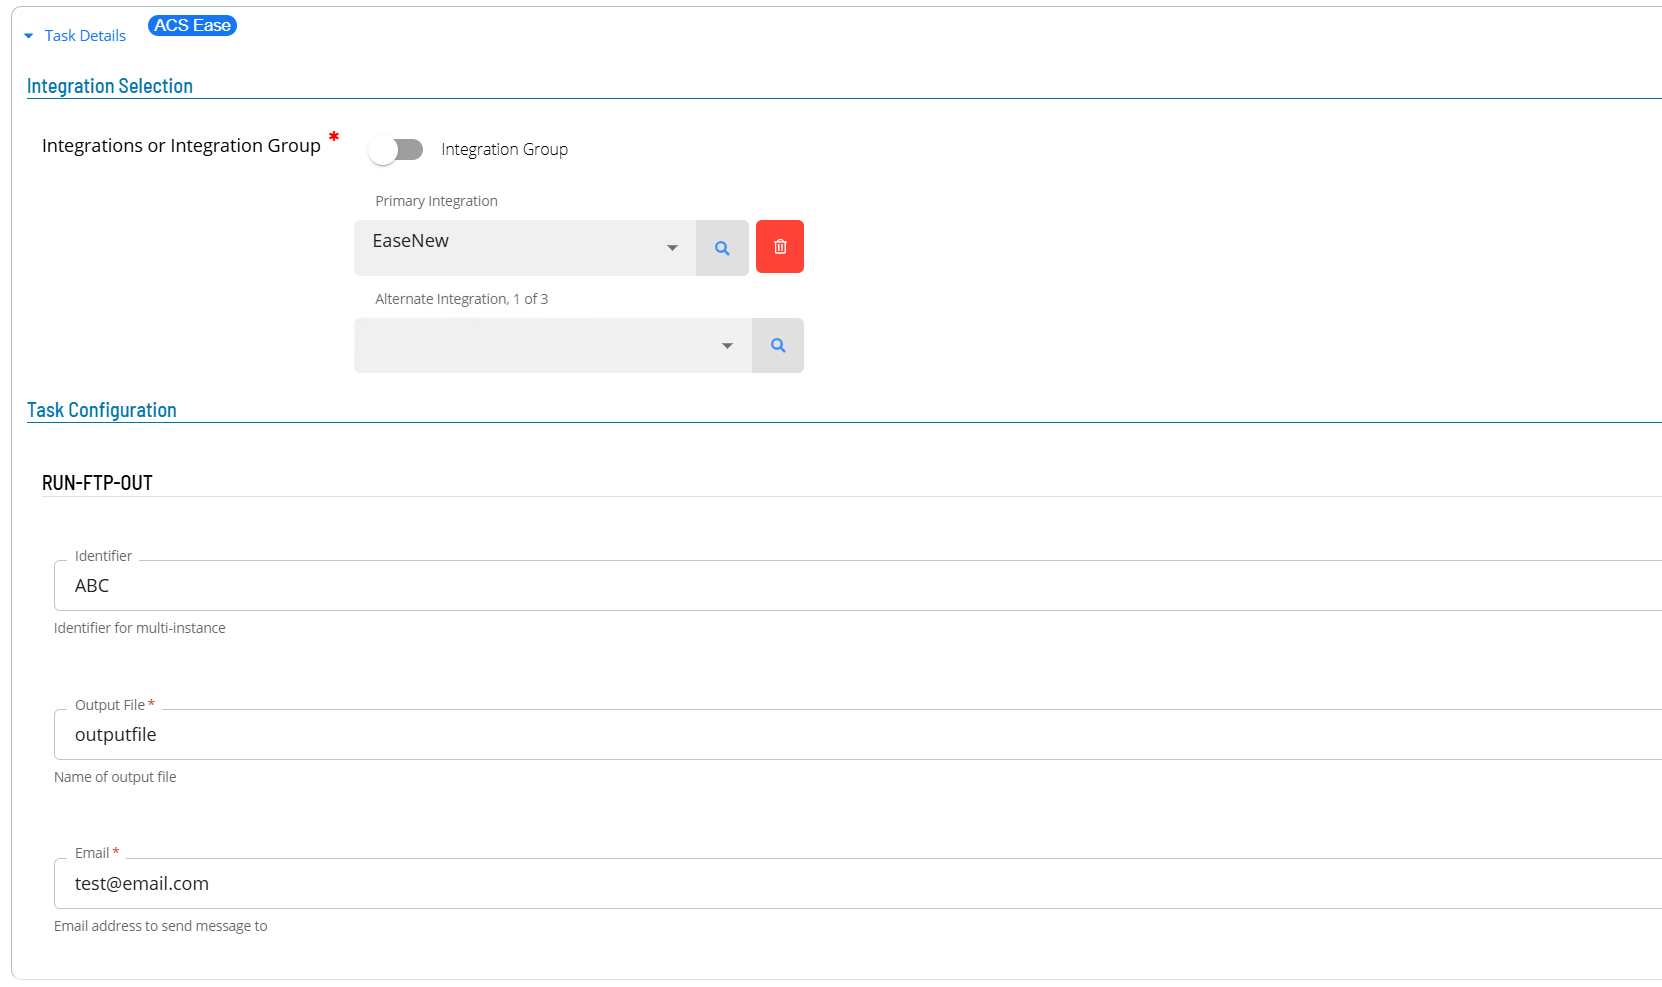
RUN-FTP-OUT Task
- Open Solution Manager.
- From the Home page select Library
- From the Administration Menu select Master Jobs.
- Select +Add to add a new master job definition.
- Fill in the task details.
- Select the Schedule name from the list.
- In the Name field enter a unique name for the task within the schedule.
- Select ACS Ease from the Job Type list.
- Select RUN-FTP-OUT : FTP Letter File off Symitar from the Task Type list.
Enter details for Task Type RUN-FTP-OUT.
- Select the Task Details button.
- In the Integration Selection section, select the primary integration which is an ACSEase connection previously defined.
- In the TaskConfiguration section
- In the Identifier field enter a unique identifier for the task.
- In the Output File field enter the output file name associated with the task.
- In the Email field enter an email address that receives notification when the transfer is complete.
- Select Save. The task definition is saved.
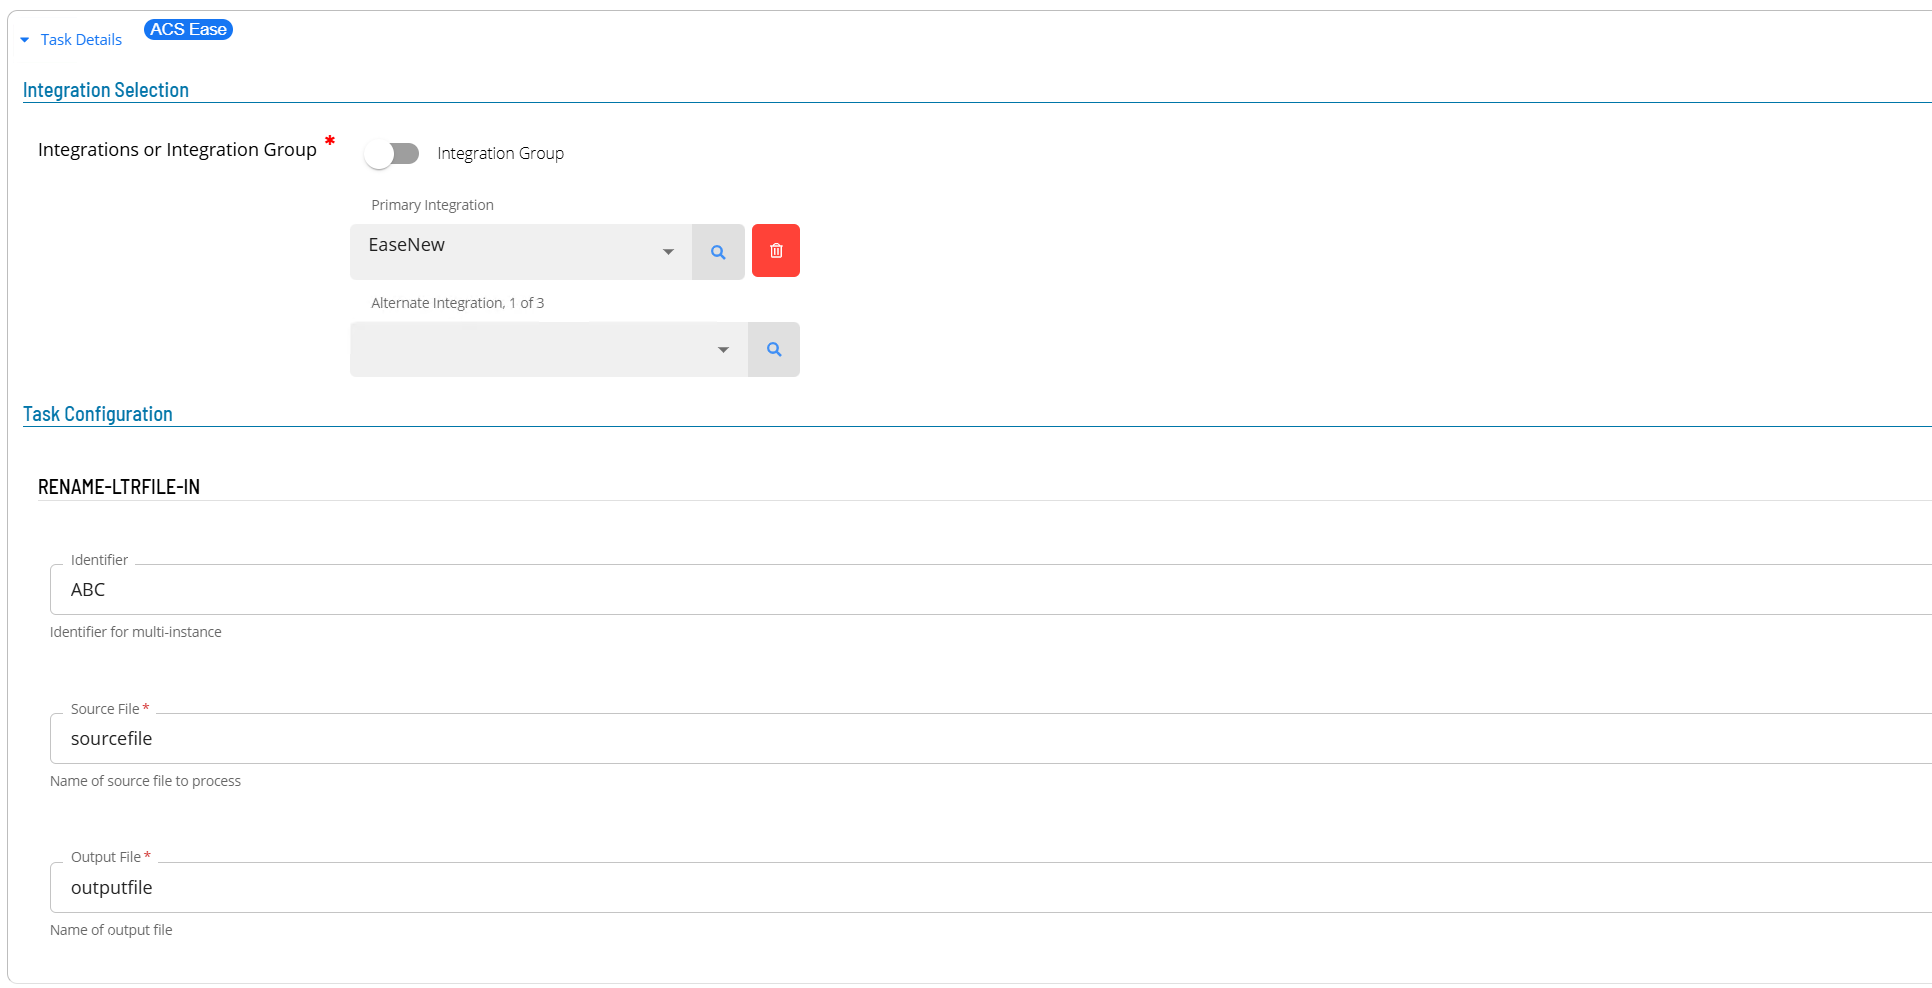
RENAME-LTRFILE-IN Task
- Open Solution Manager.
- From the Home page select Library
- From the Administration Menu select Master Jobs.
- Select +Add to add a new master job definition.
- Fill in the task details.
- Select the Schedule name from the list.
- In the Name field enter a unique name for the task within the schedule.
- Select ACS Ease from the Job Type list.
- Select RENAME-LTRFILE-IN : Rename Letter File Removing Prefix from the Task Type list.
Enter details for Task Type RENAME-LTRFILE-IN.
- Select the Task Details button.
- In the Integration Selection section, select the primary integration which is an ACSEase connection previously defined.
- In the TaskConfiguration section
- In the Identifier field enter a unique identifier for the task.
- In the Source File field enter the source file name associated with the task.
- In the Output File field enter the output file name associated with the task.
- Select Save. The task definition is saved.
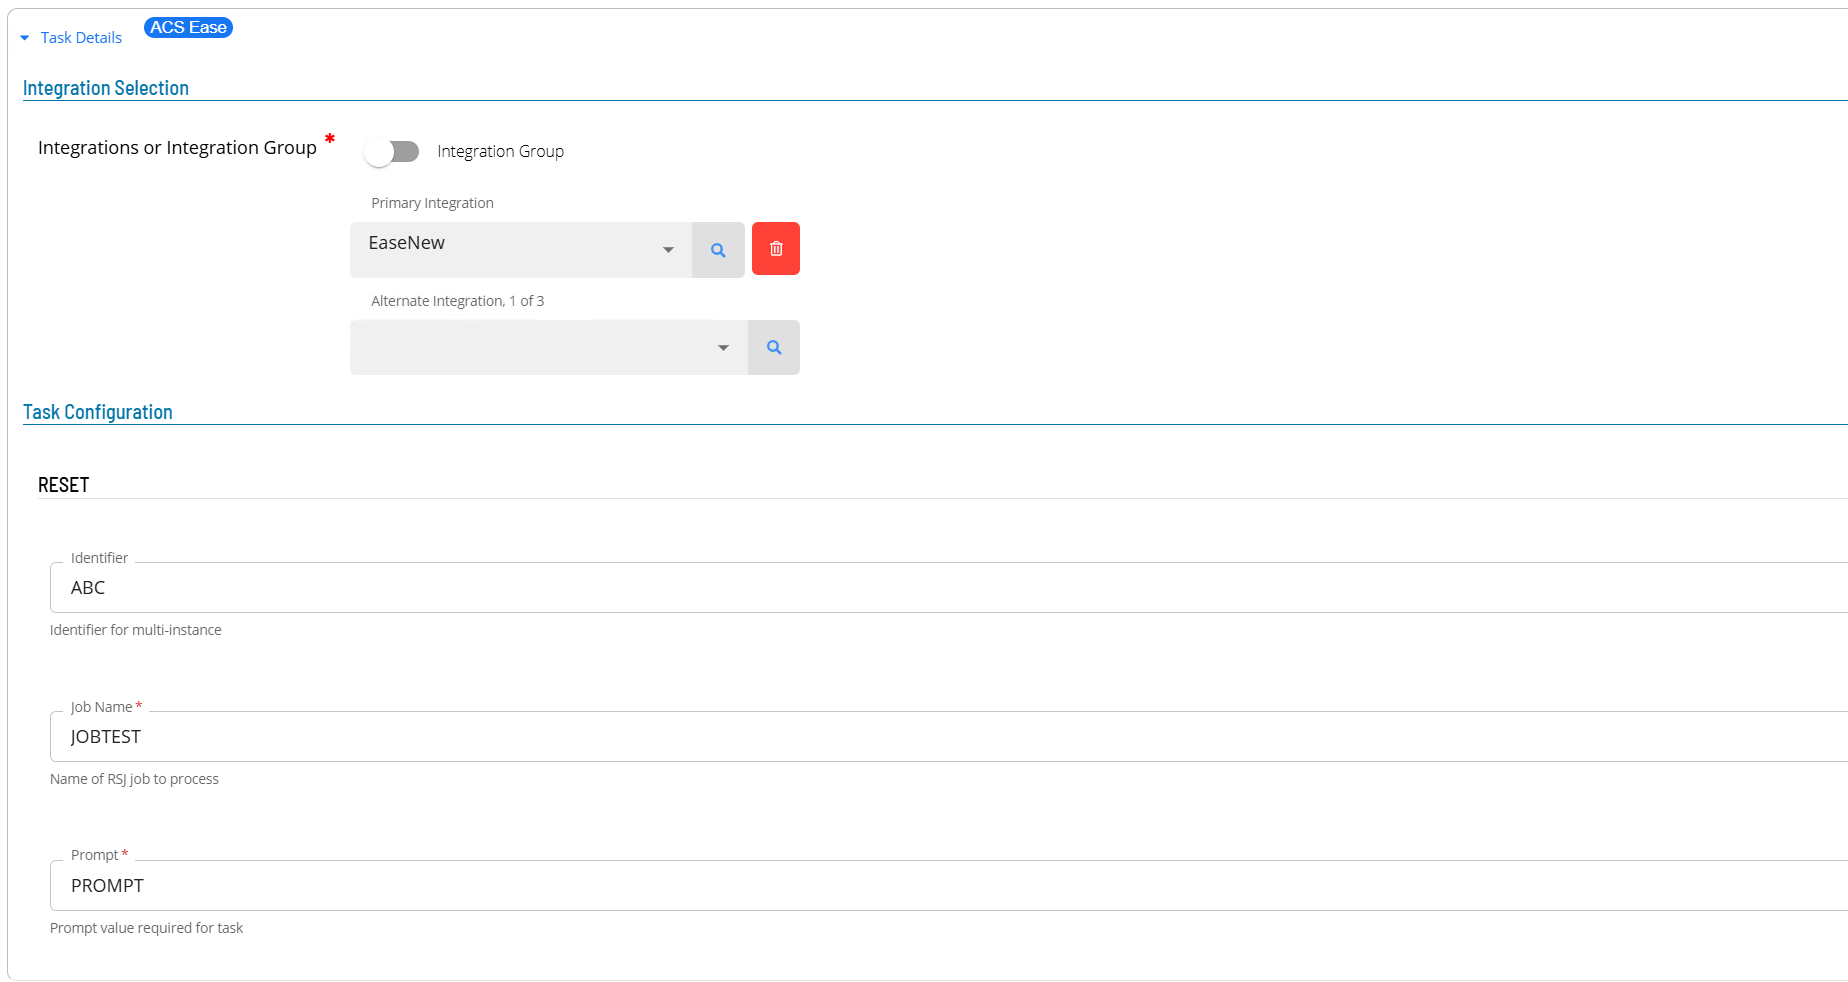
RESET Task
- Open Solution Manager.
- From the Home page select Library
- From the Administration Menu select Master Jobs.
- Select +Add to add a new master job definition.
- Fill in the task details.
- Select the Schedule name from the list.
- In the Name field enter a unique name for the task within the schedule.
- Select ACS Ease from the Job Type list.
- Select RESET : Reset a Single Prompt from the Task Type list.
Enter details for Task Type RESET.
- Select the Task Details button.
- In the Integration Selection section, select the primary integration which is an ACSEase connection previously defined.
- In the TaskConfiguration section
- In the Identifier field enter a unique identifier for the task.
- In the Job Name field enter the name of the RSJ job associated with this request.
- In the Prompt field enter the prompt to reset.
- Select Save. The task definition is saved.
RSJ Task
- Open Solution Manager.
- From the Home page select Library
- From the Administration Menu select Master Jobs.
- Select +Add to add a new master job definition.
- Fill in the task details.
- Select the Schedule name from the list.
- In the Name field enter a unique name for the task within the schedule.
- Select ACS Ease from the Job Type list.
- Select RSJ : Run Symitar Job (single-threaded) from the Task Type list.
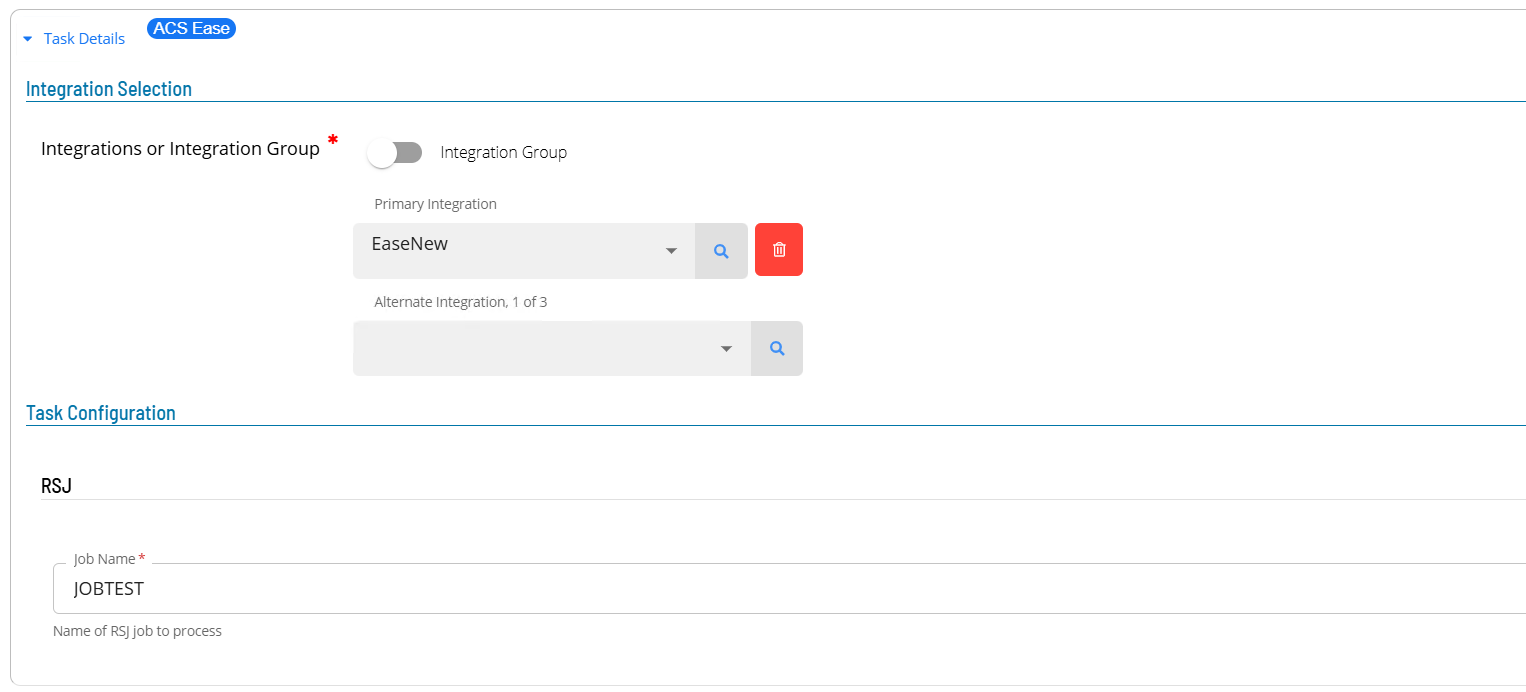
Enter details for Task Type RSJ.
- Select the Task Details button.
- In the Integration Selection section, select the primary integration which is an ACSEase connection previously defined.
- In the TaskConfiguration section
- In the Job Name field enter the name of the RSJ job associated with this request.
- Select Save. The task definition is saved.
RSJEDIT Task
- Open Solution Manager.
- From the Home page select Library
- From the Administration Menu select Master Jobs.
- Select +Add to add a new master job definition.
- Fill in the task details.
- Select the Schedule name from the list.
- In the Name field enter a unique name for the task within the schedule.
- Select ACS Ease from the Job Type list.
- Select RSJEDIT :Runs Symitar Job with Edit File from the Task Type list.
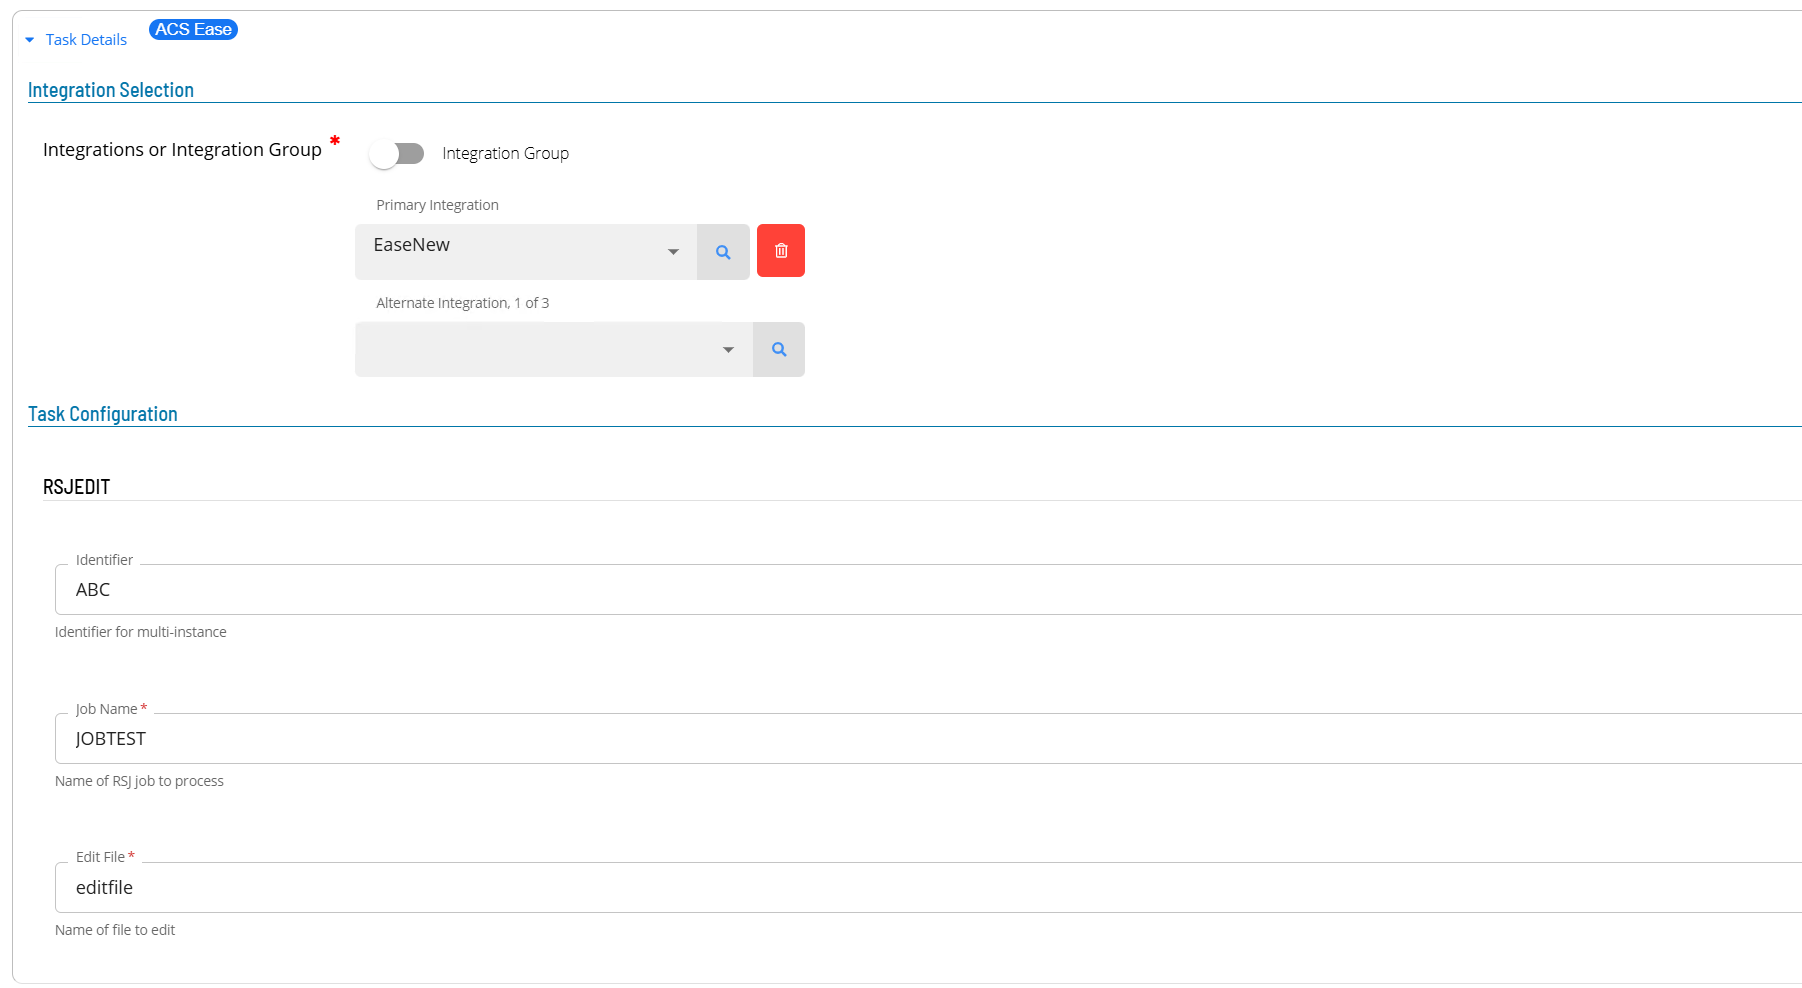
Enter details for Task Type RSJEDIT.
- Select the Task Details button.
- In the Integration Selection section, select the primary integration which is an ACSEase connection previously defined.
- In the TaskConfiguration section
- In the Identifier field enter a unique identifier for the task.
- In the Job Name field enter the name of the RSJ job associated with this request.
- In the Edit File field enter the edit file name associated with the task.
- Select Save. The task definition is saved.
RSJMULTI Task
- Open Solution Manager.
- From the Home page select Library
- From the Administration Menu select Master Jobs.
- Select +Add to add a new master job definition.
- Fill in the task details.
- Select the Schedule name from the list.
- In the Name field enter a unique name for the task within the schedule.
- Select ACS Ease from the Job Type list.
- Select RSJMULTI : Run Symitar Job (multi-threaded) from the Task Type list.
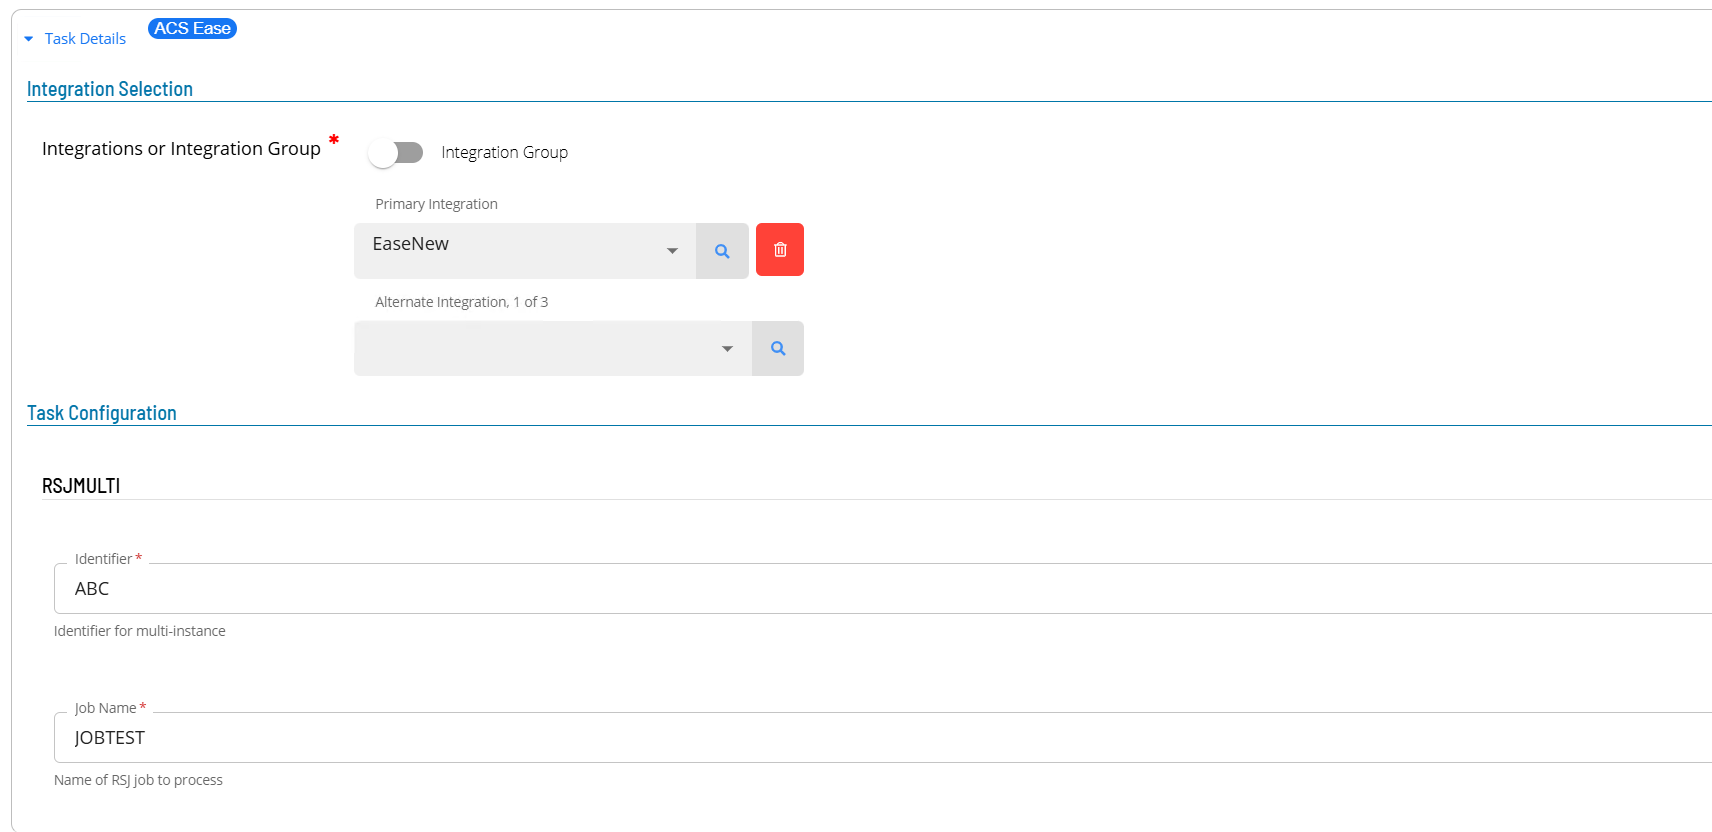
Enter details for Task Type RSJMULTI.
- Select the Task Details button.
- In the Integration Selection section, select the primary integration which is an ACSEase connection previously defined.
- In the TaskConfiguration section
- In the Identifier field enter a unique identifier for the task.
- In the Job Name field enter the name of the RSJ job associated with this request.
- Select Save. The task definition is saved.
SEQ Task
- Open Solution Manager.
- From the Home page select Library
- From the Administration Menu select Master Jobs.
- Select +Add to add a new master job definition.
- Fill in the task details.
- Select the Schedule name from the list.
- In the Name field enter a unique name for the task within the schedule.
- Select ACS Ease from the Job Type list.
- Select SEQ : Collect the SEQ of a Report from the Task Type list.
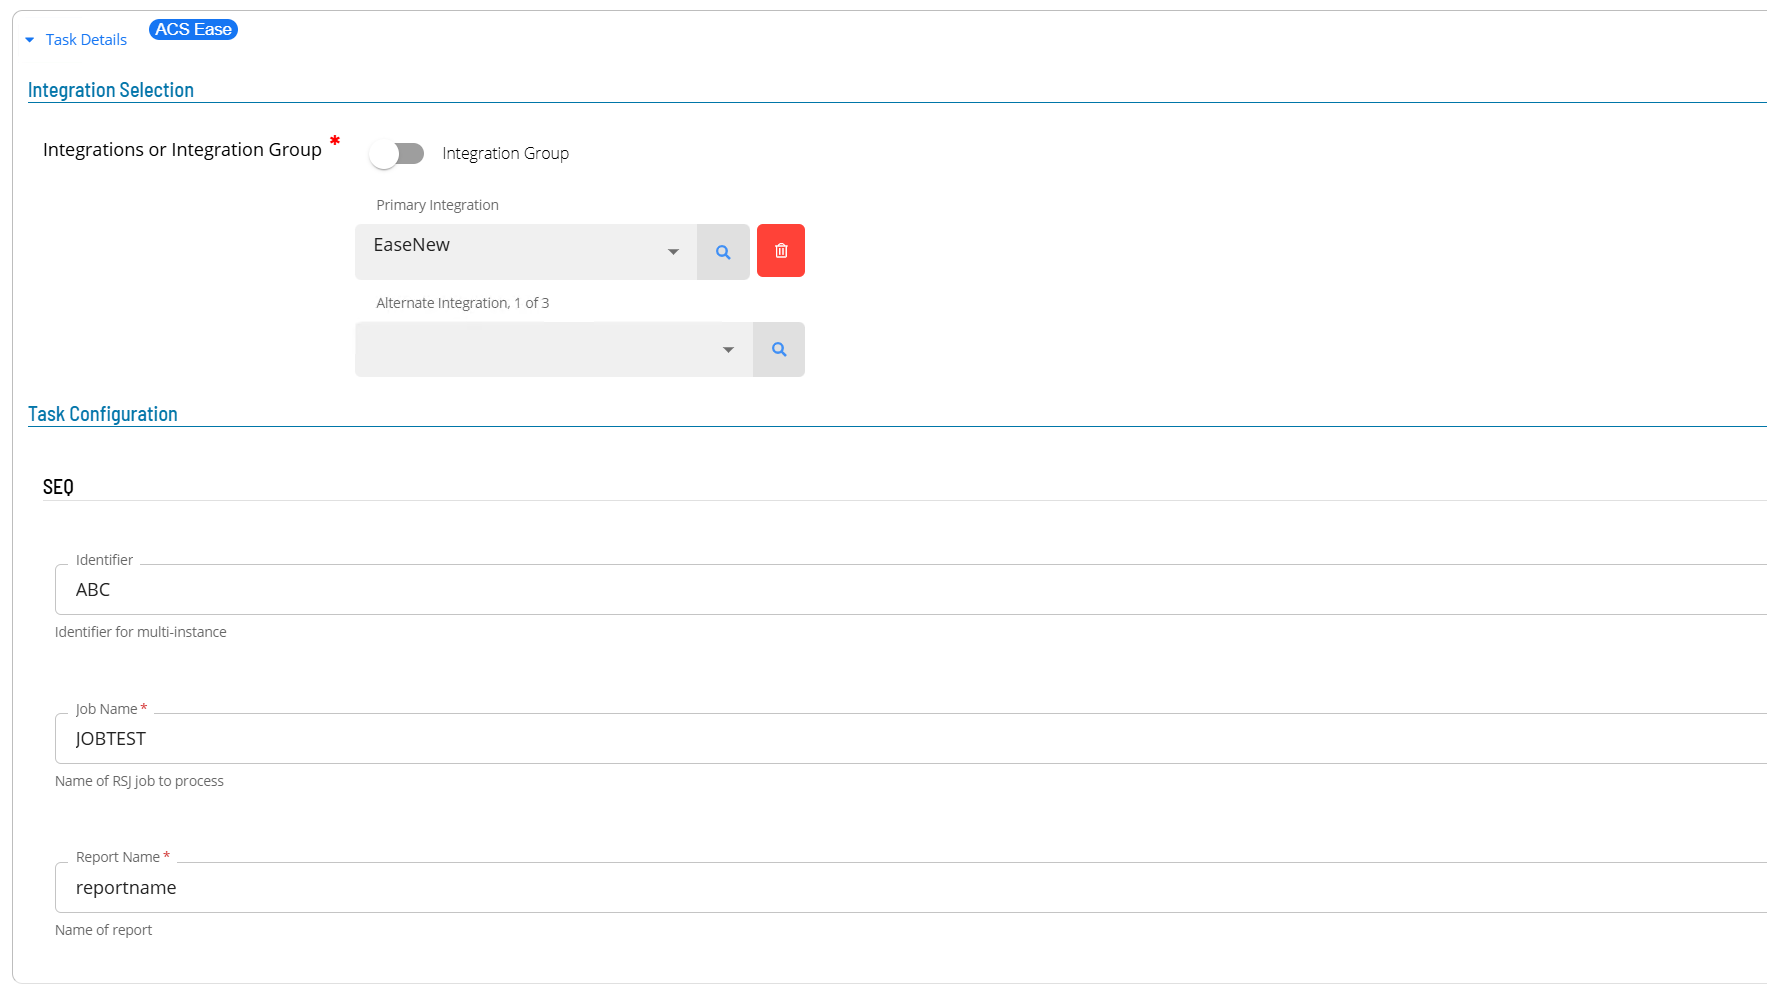
Enter details for Task Type SEQ.
- Select the Task Details button.
- In the Integration Selection section, select the primary integration which is an ACSEase connection previously defined.
- In the TaskConfiguration section
- In the Identifier field enter a unique identifier used to create a schedule instance property containing the sequence number on the Ease Datacenter OpCon environment. Any (.) period or (_) underscore characters are removed and the adjusted identifier is prefixed with SEQ-. The sequence number value is retrieved from the Ease Datacenter and stored in a global property on the local system. If the Identifier is ABC.DEF then the sequence number is stored on the local system in a property SEQ-ABCDEF.
- In the Job Name field enter the name of the RSJ job associated with this request.
- In the Report Name field enter the report name associated with the task.
- Select Save. The task definition is saved.
SEQ-SEND Task
- Open Solution Manager.
- From the Home page select Library
- From the Administration Menu select Master Jobs.
- Select +Add to add a new master job definition.
- Fill in the task details.
- Select the Schedule name from the list.
- In the Name field enter a unique name for the task within the schedule.
- Select ACS Ease from the Job Type list.
- Select SEQ-SEND : Copy Specified SEQ to Reports for FTP from the Task Type list.
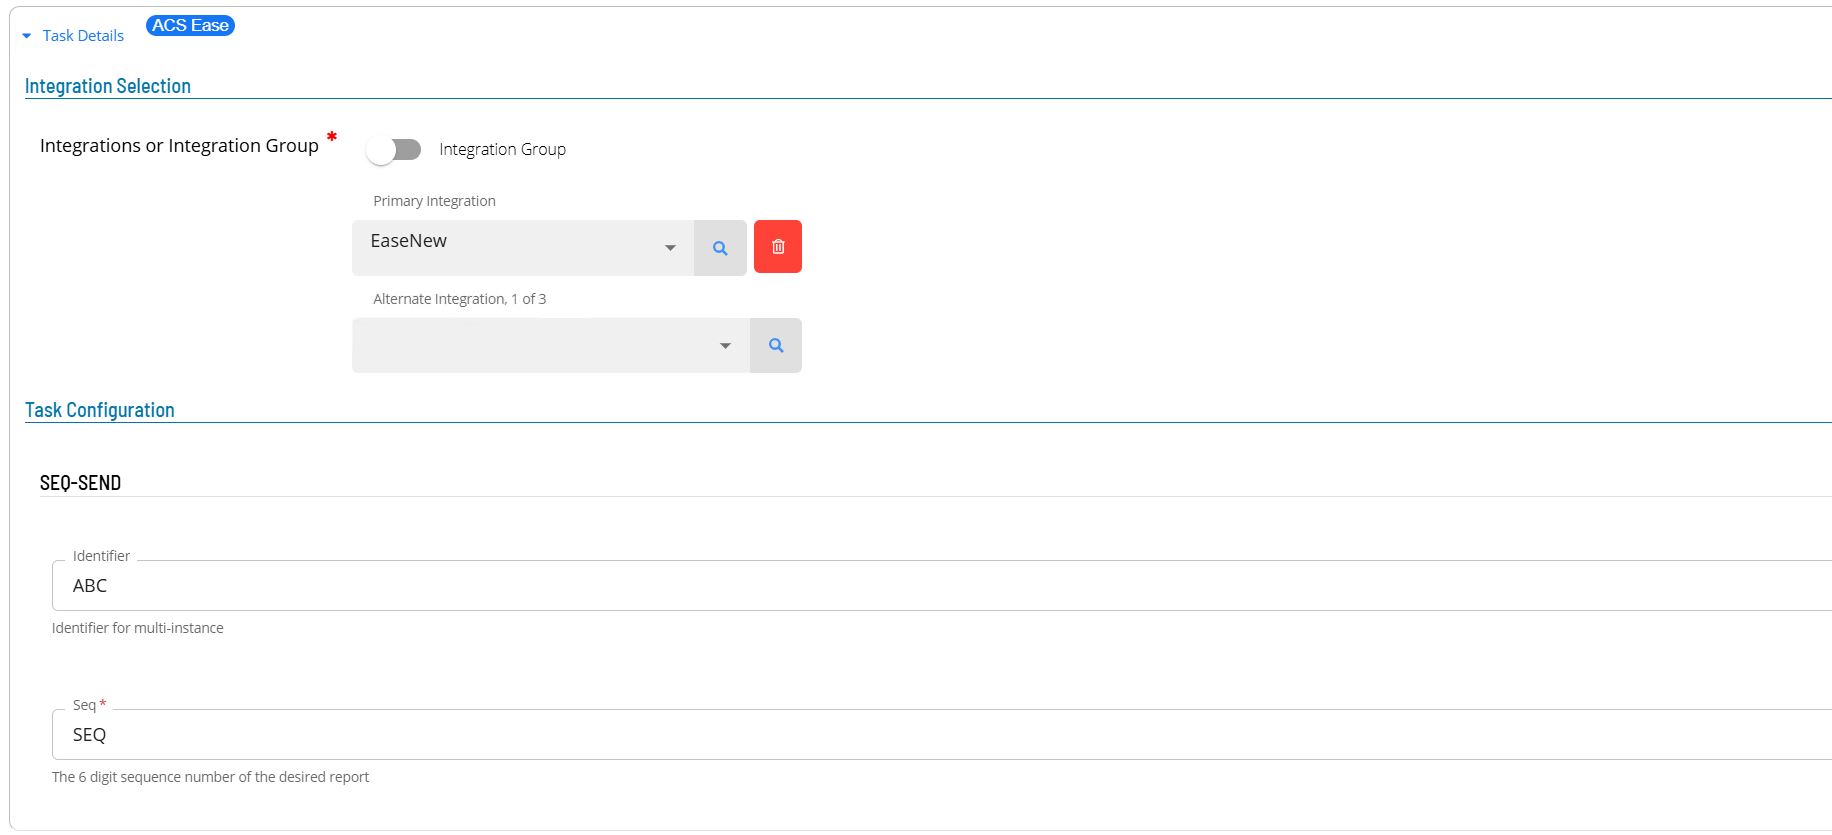
Enter details for Task Type SEQ-SEND.
- Select the Task Details button.
- In the Integration Selection section, select the primary integration which is an ACSEase connection previously defined.
- In the TaskConfiguration section
- In the Identifier field enter a unique identifier for the task.
- In the Seq field enter the six digit number of the desired report.
- Select Save. The task definition is saved.
TRANSLATE2COMMAS Task
- Open Solution Manager.
- From the Home page select Library
- From the Administration Menu select Master Jobs.
- Select +Add to add a new master job definition.
- Fill in the task details.
- Select the Schedule name from the list.
- In the Name field enter a unique name for the task within the schedule.
- Select ACS Ease from the Job Type list.
- Select TRANSLATE2COMMAS : Answer a Single Prompt containing commas from the Task Type list.
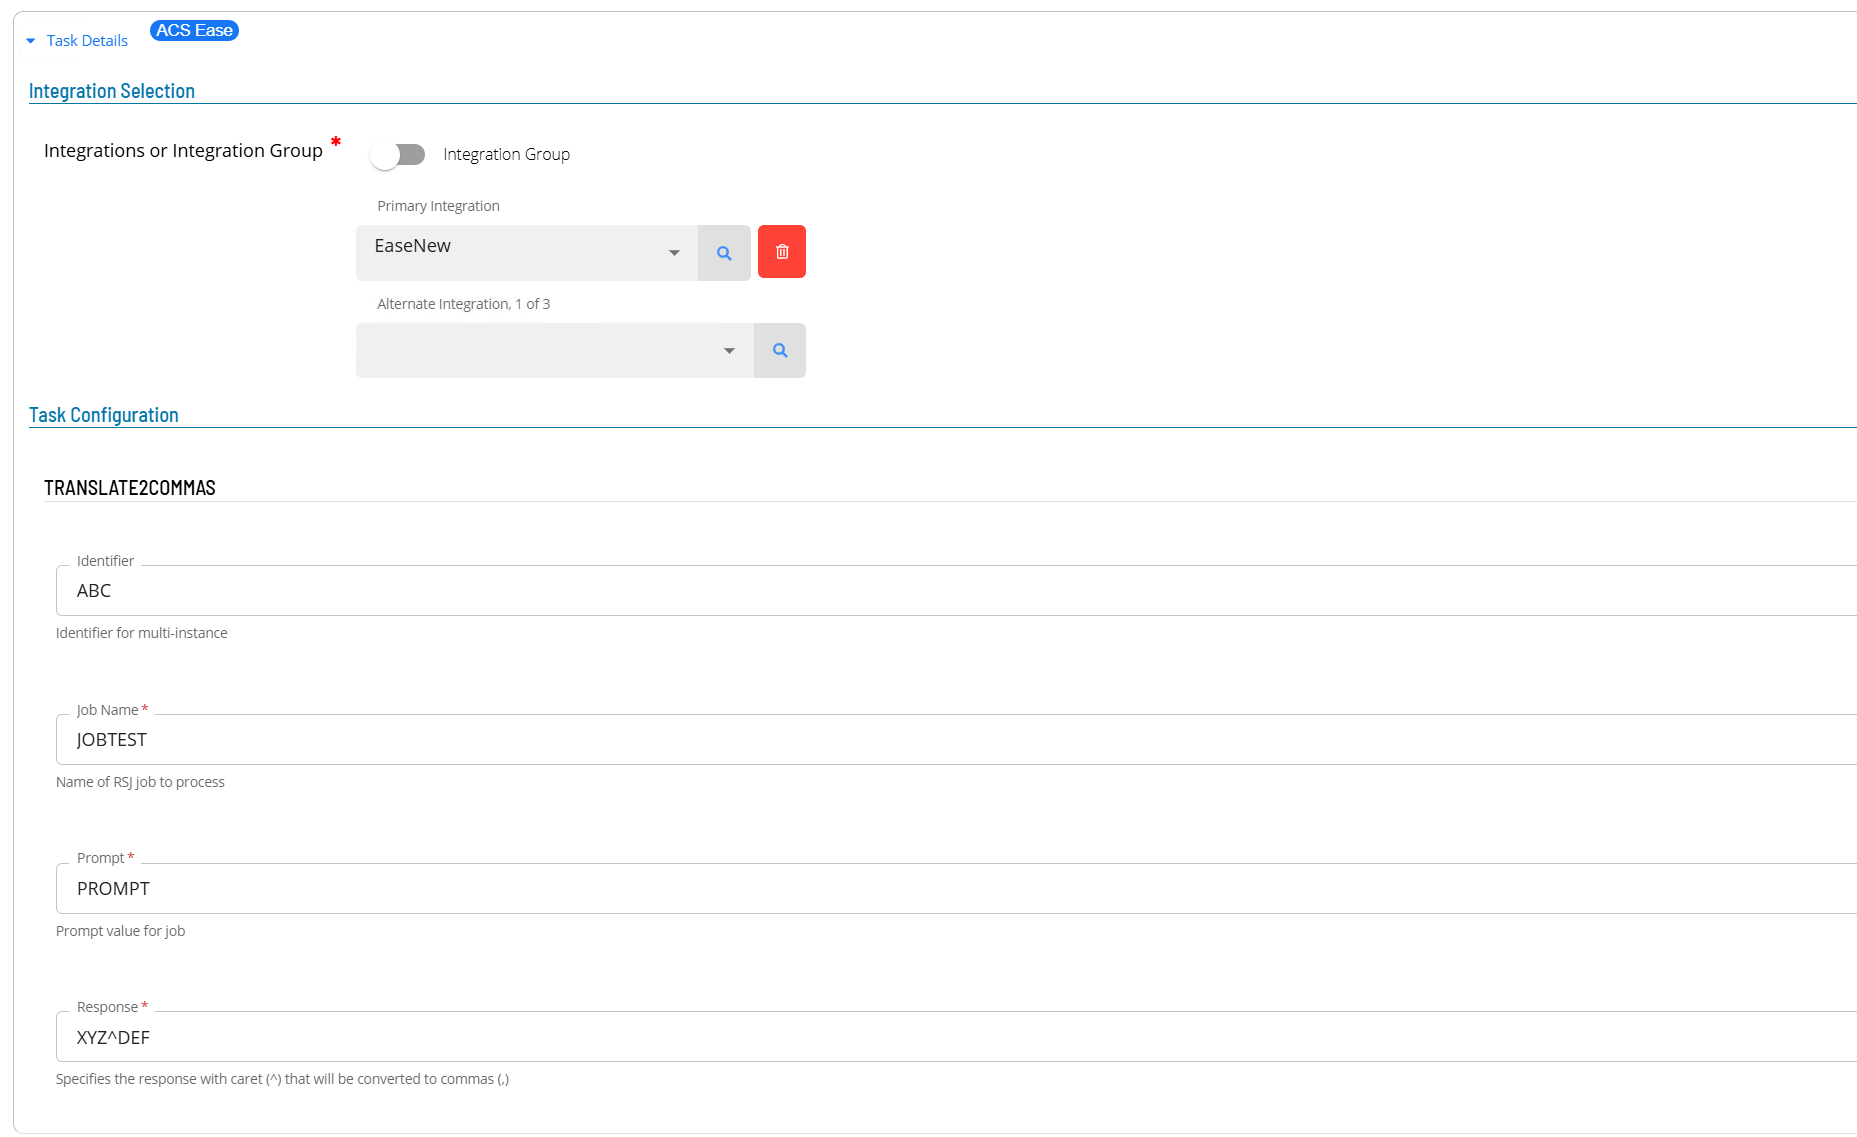
Enter details for Task Type TRANSLATE2COMMAS.
- Select the Task Details button.
- In the Integration Selection section, select the primary integration which is an ACSEase connection previously defined.
- In the TaskConfiguration section
- In the Identifier field enter a unique identifier for the task.
- In the Prompt field enter the prompt value for the job.
- In the Response field enter the response with (^) that is converted to commas (,).
- Select Save. The task definition is saved.
Glossary
ACS (Agentless Connector System) — An OpCon Agent type that provides a framework for connector development. ACS connectors are .dll files placed in a monitored folder and loaded into the OpCon environment at startup.
Container job — An OpCon job type that injects a sub-schedule into the daily schedule. Used by the EASE-LOCAL schedule to trigger bundle sub-schedules.
Ease DataCenter — The remote OpCon system managed by Ease, to which ACS Ease tasks are submitted to run. Job logs from Ease DataCenter tasks are retrieved and appended to the local task job log.
EASE-LOCAL — The local OpCon schedule that contains container jobs used to trigger bundle sub-schedules.
Sub-schedule — A schedule triggered by a container job. Sub-schedules contain the individual ACS Ease tasks that run the sequence of operations within a bundle task type.